
Cleric: General Guide
Last Updated 02-19-23: Cleric General Guide goes live!
For the new player – I only reference most auto-granted AAs in this guide with the exception of Templar’s Synergy.
The Basics
Cleric gameplay involves a combination of sustaining and reactively healing players:
- Use Ecliptic Blessing on your tank during engage (and off cooldown)
- Use Syllable of Invigoration periodically to proc Synergy for your next three heal spells
- Sustain healing using heal rotations and any other abilities/spells reactively
- Use Spire of the Vicar to reduce melee and DD damage that your group and tank takes
- Use burst heal abilities when players are taking heavy spikes of damage
How Instant Duration Heals Work
Instant duration healing is a fancier way of saying direct healing. These are heals comprising of single-target and group spells that instantly heal players as soon as they are done casting. Given the fact that mobs hit like trucks on live servers, you’ll mostly use instant duration heals.
How Duration Heals Work
Duration heals are also known as heal-over-time spells. Most HoT healing will come from either passive abilities (ie: Abundant Healing) or Celestial Regeneration. These are used to simply supplement existing direct heals. HoTs should never be used as a primary method of healing.
Spell Specializations
Specializations reduce mana cost for certain categories of spells. In both Group and Raid content, you will spend a majority of time casting heal and short-duration buff spells:
Alteration (Primary Specialization) – Affects all heal spells.
Abjuration (Secondary Specialization) – Affects all buff-related spells.
If you made a mistake and need to reset your specializations, you can always visit Ostorm in the Temple of Solusek Ro, and do his specialization reset quest.
Spell Sets
Clerics can have some slight variations in play-style. Much of it depends on your healing playstyle and AA. But quick, direct heals are predominantly used across the board.
General Spell Set
- Refreshing Splash
- Axoeviq’s Retort
- Ecliptic Blessing
- Atoned Intervention
- Sincere Intervention
- Guileless Remedy
- Sincere Remedy
- Merciful Remedy
- Shining Fortitude – also used as a fast-swap gem (ie: symbol)
- Syllable of Invigoration
- Word of Greater Rejuvenation – or Dire Renewal
- Divine Mediation
- Ward of Persistence
Raid or AE Heavy Spell Set
- Refreshing Splash
- Axoeviq’s Retort
- Ecliptic Blessing
- Atoned Intervention
- Sincere Intervention
- Guileless Remedy
- Sincere Remedy
- Merciful Remedy
- Shining Fortitude – also used as a fast-swap gem (ie: symbol)
- Syllable of Invigoration
- Issuance of Conviction
- Divine Mediation
- Ward of Persistence
Squishy Player Exp Groups
- Sound of Providence
- Aweblast
- Composite Blessing
- Mark of Ezra
- Axoeviq’s Retort
- Guileless Remedy
- Sincere Remedy
- Merciful Remedy
- Shining Fortitude
- Syllable of Invigoration
- Divine Mediation
- Ward of Persistence
Buffs
Clerics have the best HP buffs in game. All HP buffs additionally apply spell-haste as separate buffs on players.
Basic Buffs
HP Buffs > Aegolism – The Aegolism line has AC and HP in one singe buff. It does not stack with the Druid skin line. Typically, Clerics, Magicians and Paladins prefer this line of HP buff. it stacks with their self buffs which also happen to further boost HP, AC and mana-regen as well.
HP Buffs > Symbol – The Symbol line stacks with the Druid skin line. It separately applies an AC buff. For most players (especially warriors), the combination of druid skin and symbol (with the split AC buff) yields higher total AC and HP. Symbol also casts faster than the Aegolism line.
Self Buffs
HP Buffs > Shielding – The Shielding line stacks with Aegolism. It adds further HP, AC and also yields extra mana regeneration for you. Once you obtain max AA ranks of Saint’s Unity, you can cast the highest rank of level-appropriate Shielding without needing to mem a spell.
Static Buffs > Attack – The Yaulp line of buffs are found here. Don’t be fooled by the category description. Yaulp increases mana regen while you stand (meaning, you’re not on a mount). The spell can be replaced with the AA version, once you purchase max ranks of it, which will cast highest rank of Yaulp you know. Note that the ranger Predator line of buffs will block Yaulp.
Auras
Clerics are one of the few classes that can keep up two auras simultaneously on their groups. Both auras shouldn’t take too much work to keep up, since they are permanent-type auras.
Bastion of Divinity (lvl 120) – HP buff aura that increases maximum HPs by 15%
Aura of the Pious (lvl 70) – Melee guard aura that absorbs 3% of any incoming melee damage. Unlike the higher level version of this aura, it does not have a capped amount of damage absorption. Thus, it’s preferred to be used.
Short-Duration Tank Buffs
Many of these buffs are found under Utility > Beneficial sub-categories.
Shining Fortitude (lvl 119) – applies a melee guard that absorbs 10% of incoming melee damage, and also a split buff that has a chance to proc a stun and reflect a small heal back.
Axoeviq’s Retort (lvl 120) – adds a chance for the player to cast a heal proc while also applying a reverse damage shield to the mob (healing any player that strikes it).
Anticipated Interdiction (lvl 117) – a type of a melee threshold healing guard. If damage exceeds a certain amount, the buff will proc a heal on the tank. It only applies to melee damage being taken. Due to limited spell gem slots (and limited regular buff slots a tank may have), I would give Shining Fortitude preference, if you can’t manage to keep it up.
Tank Survival
These are spells and abilities beyond the normal short-duration buffs already discussed. They require further micromanaging on tanks, especially on raids. The main purpose of such buffs is for tanks to survive large damage spikes that can take them below 30% or lower HPs.
Divine Intervention Line of Buffs
In old-school terms, such spells are still referred to as “Divine Intervention.” Typically, DIs should be pre-buffed on any and all tanks and maintained. They consume 2 Emeralds per cast.
Divine Mediation (lvl 117) – when HP drops below 15%, has a 90% chance to proc a large instant heal on the bearer
Divine Guardian (AA)
All priest classes have an AA form of a “Guardian Spirit” ability. In general, the cleric’s Divine Guardian is highly preferred to be used on main tanks / warrior. This applies a 6 minute short-duration buff called Divine Guardian Spirit. It is typically cast right before a tank engages a mob.
Divine Guardian Spirit – when HP drops below 30%, procs an instant heal for 79,000 HP
Spire of the Vicar (AA)
This applies a group buff called of Apex of the Vicar, and does the following for the group:
- Reduces incoming melee damage by 5% (no capped total amount)
- Absorbs 4% of incoming direct spell damage (no capped total amount)
- Absorbs 4% of incoming melee damage by 4% (no capped total amount)
- Increases AC by 30 points
As with other class spires, Spire of the Vicar lasts 1:30 min and can be reused every 7:30 min.
Ward Line of Buffs
The ward line acts as a short-duration melee guard, absorbing a set amount of incoming melee damage per hit, for up to 8 hits total. Once 8 hits of damage occur, the ward will dissipate and proc a heal on the player.
Ward of Persistence (lvl 117) – absorbs up to 47,000 melee damage per hit, up to 8 hits total before dissipating. Upon dissipation, it will proc an instant heal of over 46,000 HP on the tank.
This spell takes 0.5 sec to cast, but has a 3 min recast timer. It is best used as a reactive measure to buy you enough time to re-cast Divine Guardian or DI during large damage spikes.
Healing
Most sustained healing can be achieved via alternating spell rotations. Periodically, you should proc Templar’s Synergy and reactively use other spells and abilities in between.
Templar’s Synergy – this is a passive AA ability requiring max ranks to be purchased
- It is procced 100% of the time by Syllable of Invigoration
- Proc lasts 12 seconds
- Increases the healing on your next 3 instant-duration heal spells by 19,500 HP
Syllable of Invigoration (lvl 118) – fastest-casting group heal that procs Templar’s Synergy
- Has a base cast time of 3 sec, but can be reduced with foci down to 1.5 sec.
- Takes 8 sec to refresh.
- Heals your group for a little over 20,000 HP
Heal Rotation #1
- Guileless Remedy
- Sincere Remedy
- Merciful Remedy
Heal Rotation #2
- Atoned Intervention
- Sincere Intervention
- Guileless Remedy
- Merciful Remedy
Ecliptic Blessing
Ecliptic Blessing should almost exclusively be cast off cooldown on a targeted tank. It provides a temporary boost to their maximum HP while also healing your own group. It has a 1 min cooldown, and should not be hard to micro-manage.
Quick Healing
The 1st heal rotation should generally be used for any opening heals. Multiple players might be taking damage where quick-healing needs to be tossed
Intervention Healing
Intervention heals are the second, quickest-casting instant-duration spells after remedies. However, they have 20 to 30 sec cooldowns (depending on AAs) and cannot be infinitely spammed on a rotation by themselves. These spells also do target’s target damage.
It’s generally best to keep a separate rotation, as depicted in the 2nd heal rotation. A bulk of your main healing should come from the 2nd heal rotation alone. However, there may be cases where you can’t use interventions (ie: they can damage/awaken targeted mezzed mobs).
Multibinding Two Spell Rotations
The fastest way to alternate between two spell rotations is to multibind both of them to a Hot Bar. This allows you to tap between two keys as needed.
1. Dedicate a Hot bar for multibinding and place spell gems for both rotations on it.
![]()
In the above example, I chose Hot Bar 10.
- Hot Buttons 2 through 5 have spell gems mapped out for the 1st rotation.
- Hot Buttons 8 through 11 have spell gems mapped out for the 2nd rotation.
2. Open your Options window via ALT + O
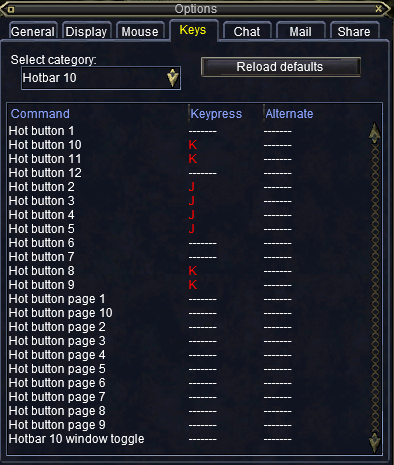
- Select the Hot Bar category (again, in my previous example I am using Hot Bar 10)
- Assign a key for Hot Buttons 2 through 5 (I used my “J” key) for the first rotation
- Assign a key for Hot Buttons 8 through 11 (I used my “K” key) for the second rotation
- Done! Test your new multibind keys out on a player (or yourself) to ensure they work
General Survival
Clerics have a myriad of survival abilities for emergency situations.
Self Survival
Divine Aura (AA) – regardless of the rank you have of this ability, it will make you invulnerable to most mob attacks for 18 sec. The only difference with higher purchased ranks is the amount of healing it additionally provides you.
Sanctuary (AA) – will instantly heal you for a large amount of HPs regardless of rank. It will also place you on the bottom of the mob(s) aggro list.
Blessing of Sanctuary (AA) – this is the targeted version of Sanctuary. Due to the aggro reduction component, it should never be used on a tank. You are better off saving it for yourself as a backup for when Sanctuary is off cooldown.
Divine Peace (AA) – a cleric’s only fade ability. It will allow you to escape combat from mobs that are up to five levels higher than you. It is also useful to remove yourself off any rampage attacks on raids mobs.
Divine Contingency (lvl 117) – a self buff useful for when facing heavy AE spell damage on raids. If you get hit by a minimum AE damage value, the buff will dissipate and instantly heal you. it’s great to pre-buff yourself with before the start of a raid event.
Group Member(s) Survival
Bestow Divine Aura (AA) – the targeted version of Divine Aura. This can be helpful for casting on another player if they are running away from an emote that will further damage them.
Divine Arbitration (AA) – balances the HP of all nearby party members and applied a heal.
Divine Balance (Epic 2.0) – used as a backup if Divine Arbitration is on cooldown. It balances the HP of all nearby party members, applies a small heal and also has a 95% chance to dispel a detrimental effect.
Burst of Life (AA) – instantly heals a targeted player. Has a 3 min cooldown.
Beacon of Life (AA) – instantly heals all nearby group members. Has a 3 min cooldown.
Spire of Vicare
It’s worth mentioning a cleric’s spire separately here. It can only be used once every 7:30 minutes, and it lasts a 1:30 minutes. On raids, two clerics are generally shoved into a tank group, and they can alternate it’s use.
In group settings as a solo cleric, it is best to use it when you know a tank is about to take heavy damage. This can apply to either a named boss/mob. Or it can apply to a tank dealing with multiple adds. In short, it absorbs 4% of melee and direct spell damage for the group. It also does something similar for you, personally, as a split/separate buff – but at higher percentages.
Burst Healing
Similar to how DPS players boost their damage for a short period of time (aka “burn”), clerics can boost their healing spells and abilities when heavy damage is taking place on players.
Hot Bar Organization
In order to not forget to click certain abilities or to keep track of their order, it’s recommended to dedicate a Hot Bar entirely for any boosted healing actions.
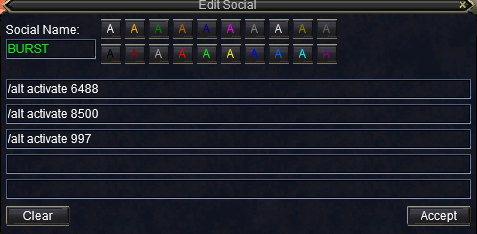
![]()
1. Hot Buttons 1 through 5 (for Method #1):
- Channeling the Divine – gives you 17 twincasts to use for healing spells
- BURST Social Key – to instantly activate Flurry of Life and Healing Frenzy
- Flurry of Life – increases the power of instant duration heals
- Healing Frenzy – grants you a 100% chance to crit instant duration heals
- Celestial Rapidity – reduces cast time of healing spells by 50%
- Syllable of Invigoration (spell gem)
2. Hot Buttons 7 through 12 (for Method #2):
- Refreshing Splash (spell gem)
- Issuance of Conviction (spell gem)
- Forceful Rejuvenation – instantly refreshes spell gems off cooldown
- Refreshing Splash (spell gem)
- Issuance of Conviction (spell gem)
The first 5 Hot Buttons are what you want to focus on first. This is useful for general burst healing when tanks are taking heavy damage. Channeling the Divine has a cast time unlike the other abilities mentioned, and it cannot be shoved into a social key as a result.
The purpose of the social key is to make it easier to just activate instant abilities with one click. However, it’s best to keep those abilities on the Hot Bar separately just in case the Social Key doesn’t fire them off (ie: if lagging).
Main Burst Healing (Method #1)
It’s pretty simple if you go based on the suggested Hot Bar. You are clicking the following:
- Click: Channeling the Divine
- Click: BURST Social Key – activates Flurry of Life + Healing Frenzy + Celestial Rapidity
- Click: Syllable of Invigoration – for a fast group heal and to proc Templar’s Synergy
AE Burst Healing (Method #2)
This is reserved for raids more than anything where multiple mobs are in camp or if facing repeated, heavy AE damage. In some cases, you may have a cast order for Issuance. If not, then focus on double-splashing at least.
- (Optional) Click: Syllable of Invigoration – if off cooldown at the time to proc synergy
- Click: Refreshing Splash
- Click: Issuance of Conviction
- Click: Forceful Rejuvenation – refreshes spell gems off cooldown
- Click: Refreshing Splash
- Click: issuance of Conviction
Cures
Clerics have several methods to cure players. These are available as AA abilities and spells.
AA Ability Cures
Radiant Cure (AA) – Has a 1 min reuse time. Group cure that does the following:
- Has a 1.75 sec cast time
- Cures 35 poison counters
- Cures 35 disease counters
- Cures 35 curse counters
- Has a 95% chance to remove 1 detrimental effect
Purify Soul (AA) – Has a 5 min reuse time. Single-target cure ability that does the following:
- Instant cast
- Cures 76 poison counters
- Cures 76 disease counters
- Cures 76 curse counters
- Cures 38 corruption counters
- Has a 95% chance to remove up to 6 detrimental effects
Group Purify Soul (AA) – Has a 15 min reuse time. This is the group version of Purify Soul.
Spell Cures
Word of Greater Rejuvenation (lvl 120) – group heal and cure that does the following:
- Has a base cast time of 4 sec, but can be reduced by foci to 2.36 sec
- 24,000+ HP instant-duration heal on all group members
- Cures 40 poison counters
- Cures 40 disease counters
- Cures 32 curse counters
Sanctified Blood (lvl 119) – this is a single-target cure spell that does the following:
- Has a cast time of 2.25 sec and is NOT affected by any worn foci
- Cures 42 poison counters (twice)
- Cures 42 disease counters (twice)
- Cures 53 curse counters
- Cures 53 corruption counters
The Not-So Obvious
Word of Greater Rejuvenation has a relatively similar cast time to Sanctified Blood – not to mention that it will also heal party members in the process. This will save you more time in the long run if one or more party members are taking damage and needing cures at the same time.
Word of Greater Rejuvenation is useful under the following conditions:
- Cures are needed within your own group
- There is NO corruption curing needed – or it was cleaned up by Purify Soul already
- The party members that need the curing are within your group heal’s range
Keep in mind that certain debuffs/DoTs afflicting players have varying degrees of “counters” which may require more than one cast to get rid of them.
Calls and Rezzes
Clerics have several ways to rez players. It is important to rez mid-combat a fallen player, especially a tank, to avoid a wipe.
Battle Rezzing
These are all rezzes that can be used mid-combat.
Blessing of Resurrection (AA) – this is an auto-granted ability that casts a 96% rez
- Has a 9 sec reuse time
- Takes 3 sec to cast
Divine Resurrection (AA) – instant 100% rez
- Has a 7:15 hour reuse time (realistically, used only once a day)
- Instant cast
- Will bring a player back to their corpse with 100% mana and endurance
- Usually reserved for another cleric/priest that is healing a tank group
Call of the Herald (AA) – this is call ability, casting a 0% rez
- Has a 5 min reuse time
- Takes 6 sec to cast
- Player will be brought back with 20% mana and endurance
- Player can get a regular rez on their corpse later
Staff of Forbidden Rites (Item Clicky) – casts a 90% rez
- Has a 30 sec reuse time
- Takes 1 sec to cast
When comparing these rezzes, the Staff of Forbidden Rites can make or break a near wipe where you need to rez multiple dead tanks. If you have the staff, then you can alternate with Blessing of Resurrection.
Call of the Herald should be reserved for a Druid or Ranger at best and when you have luxury to spend 6 seconds to cast such a long-casting ability (during non emergencies). Unfortunately, you may be better off using this ability in group mission content.
AE Resurrection
Superior Reviviscence (lvl 76) – AE rez that can be used once you are out of combat
Miscellaneous
While clerics are limited in DPS and solo capabilities, there are a couple utility spells that can come in handy for you in group content.
Pulling and Solo Questing
Clerics, being a plate class, can take quite a few hits (better than cloth casters at least). This makes them decent pullers with the right spells and abilities. There are also a few current content quests (mainly of the turn-in and “Hail” variety) that can very well be done solo with a little bit of time and patience.
Contenting Glow (lvl 116) – part of your calm line of spells.
- Lowers the aggro radius of the targeted mob
- This allows you to pull a surrounding mob that’s not too close to it, without aggro
- It may also allow you to walk past mobs without aggro
Mark of Ezra (lvl 119) – a reverse damage shield and best spell for pulling mobs. It doesn’t deal any direct damage, making it safer for pulling mobs that might summon.
Vindication (lvl 116) – has a 52% chance to mem blur a mob
- This spell has a 12 sec recast time
- Generally, best to use on a rooted mob to ditch aggro
- If the mob disappears off your extended target window, then it was successfully blurred
Blessed Chains (AA) – auto-granted ability that can root a mob up to 1:00 min
- Has a 3 sec reuse time
- Has a 1.25 cast time
- Eliminates the need to mem a root spell
- This can also be used for root-pulling in places where you can’t use a calm spell
Dealing With Aggro
If you happen to aggro unwanted mobs, there are a couple of ways to deal with them.
1. If it’s a single mob – Blessed Chains (root) and then Vindication (blur)
2. If mobs are on top of you
- You can use Divine Aura (AA) – it will make you invulnerable for 18 sec
- Run away to safe enough distance, click DA off, and use Divine Peace
3. If mobs are aggro at a distance – then just use Divine Peace
4. You can also keep mobs busy/distracted (albeit it will only be for a few seconds) with your summoned hammer pets (AA and spell).
Types of Pulling
- Single-pulling with a calm spell and mark
- Stun-pulling – if you want to bring two mobs, but keep one delayed so they don’t both beat up on you once they come in camp
- Root-pulling – if there is no way to single-pull with calm, you can root on mob and the other will automatically aggro
General Stunning
If you happen to be in regular exp groups where players are undergeared or taking way too much damage, it will help to just load two stun spells. These can help with damage mitigation:
- Sound of Providence (lvl 118)
- Aweblast (lvl 116)
Both these stun spells work on stunnable mobs up to level 120. They also damage the mobs and reflect heals back to their targets.