
Druid: DPS Guide
Last Updated 02-18-23: With the NoS expansion, Druids are heavily dotting multiple mobs on raids. There continues to be a reduction in using dicho-type spells (Ecliptic Winds) while nukes may be scaled back in favor of conserving mana for DoTs. I have also included an AE section at the bottom of this guide. This should be viewed as an advanced guide, and which is largely aimed towards decently-geared druids.
DPS Setup
There isn’t a one-size-fits-all approach to spell setups. If you’re forced to keep up a cure spell, then you will need to make room for it. Different group missions and raid events also require different spells sets when you factor in a single-mob fight vs multiple waves of adds.
Single-Mob Burn/DPS
- Twincast
- Sootheseance
- Chill of the Dusksage Tender
- Lunarush
- Survival of the Unrelenting
- Nature’s Sweltering Wrath
- Horde of Duskwigs
- Sunpyre
- Tenebrous Sunray – can be used as a fast swap gem
- Remote Sunbolt
- Summer Sunpyre **
- Winter’s Wildbrume
- Bloody Roar
** Ecliptic Winds can be used in lieu of Summer Sunpyre on quick, single-target fights.
Multiple Mobs or Receiving Heavy AE Damage
Good for where you need to do extra healing.
- Twincast
- Sootheseance
- Adrenaline Spate
- Lunarush
- Survival of the Unrelenting
- Nature’s Sweltering Wrath
- Horde of Duskwigs
- Sunpyre
- Tenebrous Sunray – can be used as a fast swap gem
- Remote Sunbolt
- Summer Sunpyre
- Winter’s Wildbrume
- Bloody Roar – or Heliacal Conflagration
Hot Bar Organization
It’s strongly recommended that you dedicate 5 Hot Bars to your entire DPS setup (and easy access to any AA or Group healing in between). It will make it faster to simply click any spells and AAs without needing to think too much.
The AA Nukes wedged in between spells will be explained in their own chapter of this guide.
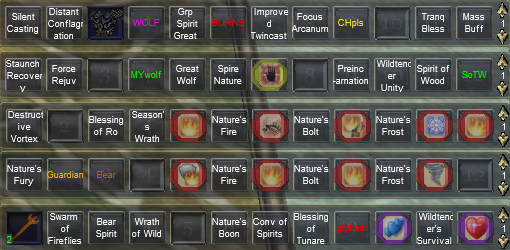
- Row 1: Includes main abilities and social keys used during burns
- Row 2: Includes self wolf, spire and twincast spell (any lesser burn related items)
- Row 3: Includes debuffs and all DoT related spells
- Row 4: Includes nuke related spells
- Row 5: Includes any AA healing, tank benefits and groupg-healin related items
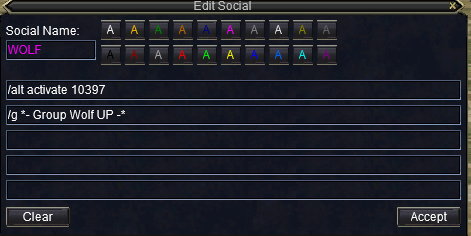
Recommended Social Keys
WOLF – will instantly activate Group Wolf and announce it to your group chat
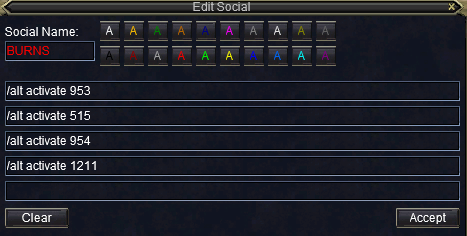
BURNS – this will instantly activate:
- Improved Twincast (ITC)
- Destructive Vortex (DV)
- Nature’s Fury (NF)
- Focus of Arcanum (FA)
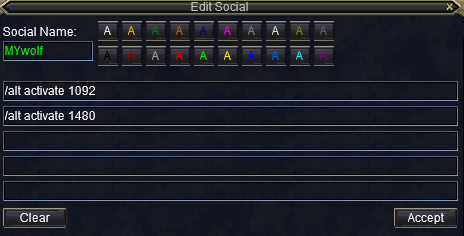
MYwolf – this will activate your self-wolf ability along with Spire of Nature
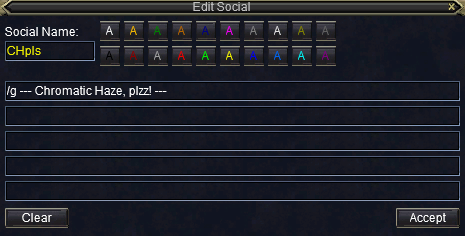
CHpls – this is useful if you have an enchanter in group. When burning, they should wait to apply Chromatic Haze until you land Nature’s Sweltering Wrath.
Crit Chance Rates
There should be some form of basic understanding as to what goes on behind some of the aDPS you receive, and how it affects your spells. Key class aDPS abilities can affect how you time your own burns – most importantly, those of an Enchanter.
Passive Crit Chance Rates
Before aDPS discussion can begin, know your maximum passive crit chance rates obtained through various AA abilities. You can revisit the Personal DPS section of the: AA Ability Guide
| CLASS | DD CRIT % | DOT CRIT % |
|---|---|---|
| Druid | 58% | 56% |
Activated Crit Chance Rates (from AAs)
This is a list of all abilities that other classes can bestow on you, as well as your own personal abilities. Not all these abilities may be used at the same time (and you’ll see why shortly).
| CLASS | ABILITY | DURATION | REUSE TIME | DD CRIT % | DOT CRIT % |
|---|---|---|---|---|---|
| Druid | Group Wolf | 04:00 min | 07:30 min | 14% | none |
| Druid | Self Wolf | 04:00 min | 07:30 min | 20% | none |
| Druid | Spire of Nature | 01:30 min | 07:30 min | 24% | none |
| Druid | Destructive Vortex | 01:00 min | 13:00 min | none | 10% |
| Enchanter | Illusions of Grandeur | 02:00 min | 12:00 min | 13% | 13% |
| Enchanter | Spire of Enchantment | 01:30 min | 07:30 min | 9% | none |
| Ranger | Auspice of the Hunter | 01:36 min | 09:00 min | 33% | 33% |
| Bard | Fierce Eye | 02:12 min | 03:00 min | 17% | 17% |
| Bard | Spirit of Vesagran (Epic) | 02:00 min | 03:00 min | 12% | 12% |
aDPS and Personal Abilities During a Full Burn
The goal is to try and get as high to a 100% crit chance rate as you can. Several abilities you will commonly see activated during a full burn on raids are:
- Druid – Group Spirit of the Great Wolf
- Druid – Destructive Vortex
- Enchanter – Illusions of Grandeur
- Ranger – Auspice of the Hunter
Now let’s see what happens when we factor your passive crit chance rate in with these abilities.
- Total DD Crit % = 118%
- Total DoT Crit % = 102%
Crit Chance is Capped at 100%
You may be grouped with a Bard on raids in which case you’ll see yourself way over the capped amounts as a result – and that is fine. Keep in mind that many abilities provide other benefits such as increased crit strength or other types of damage modifiers. However, there are certain abilities that you definitely don’t want to waste during such periods – ie: Spire of Nature.
Keeping a Constant Flow of High Crit Chance
Spire of Nature and Self Wolf typically get paired together to maintain a high constant flow of crit chance rate for DDs at least – especially during non full burn times. Unfortunately, Druids do not have any abilities beyond Destructive Vortex which affect DoT crit chance rates.
As an example:
- Druid – Spirit of the Great Wolf
- Druid – Spire of Nature
Result (with passive crit chance rates factored in):
- Total DD Crit %: 102%
- Total DoT Crit %: 56%
While you’re stuck with just the passive crit chance rate for DoTs, it is still not bad considering you have quite a few nukes to sustain in between DoTing.
aDPS Basics
aDPS that you provide your group comes in two forms:
- Group Spirit of the Great Wolf – constant aDPS that lasts 4 minutes on group
- Nightchill Aura – adds cold procs to damage spells cast (lasts 6 minutes)
Group Wolf is a Constant aDPS Ability
Unlike burn abilities with short durations (2 min or less) and long refresh times, Group Wolf should be used each time off cooldown. It’s not worth holding off more than a minute on it.
Group Wolf and Improved Twincast
If we are to assume that a raid event takes your raid team 20 minutes to complete, and that the first round of burns are diligently being used at or near the start:
- Burns occur at the start, Group Wolf is used along with Improved Twincast
- Group Wolf has a 7:30 min reuse time
- Improved Twincast has a 15 min reuse time.
- A 20 min event means you are able to use Group Wolf three times
- Your third Group Wolf should be back up at the same time as ITC
This lends to the reasoning of why Group Wolf should always be used off cooldown. In theory, it should be back up no matter what for a second round of burns with ITC.
Burns Are Planned Around Improved Twincast
This is important for you to know in terms of aDPS you receive, and what personal abilities you happen to have up (such as Destructive Vortex). If an event looks like it will be dead two minutes before ITC will be back up, your Enchanter will probably not wait for it and just run their IoG anyway. This means you should run any abilities you happen to have up with their IoG. You might even have Twincast (spell) up to make up for not having ITC available.
Mana Management
Once you enter the realm of Druid DPSing, mana management becomes extremely crucial. How you manage your mana will depend on how long your raid team typically finishes events.
Mod Rods
Always make sure you have a rod with three full charges before an event starts. You should start clicking the first charge by the time you reach 80% mana. As soon as you finish using the third charge, ask a mage for a new rod.
Sum: Warder
You better summon “boo boo” every 5 minutes to get some mana back!
Bolstered Growth should also be used once around 80 percent mana, and then every 5 minutes as it’s available for re-use.
Ask a Cleric for Quiet Prayer
When I see myself at around 70 percent mana that’s when I start asking a cleric for “QP.” You can only get QP once every 5 minutes. It helps to see what clerics are around and create social keys in advance sending them tells for it.
Group and Self Wolf
If you ALWAYS have a Wolf up, you will have a 100% uptime of reduction in mana-cost for spells you cast as well as increased mana regen! These abilities should be alternated off cooldown with Group Wolf always being used first, then Self Wolf – rinse and repeat.
Gift of Mana
Gift of Mana procs should be reserved for spells that cost ridiculous amounts of mana (ie: Nature’s Sweltering Wrath). An Enchanter in group will periodically proc group GoMs for you as well. It pays to have a GINA trigger alerting you when a GoM is on you.
DoTing
DoTs are typically applied first on a mob. They are applied in the following order:
DoT Order
1. Nature’s Sweltering Wrath – fire-based and biggest burst-damage spell. Short-duration.
- Has an initial DD component, and then a stronger DoT component.
- Lasts 18 sec on a mob, and takes 18 sec to refresh
- Easy to gauge when it wears off a mob, as the spell gem will be refreshed
- Duration cannot be extended by any foci
- Highest mana-cost DoT
2. Horde of the Duskwigs – magic-based and long-duration spell.
- Can be extended over a minute by foci
- Has a 6 sec refresh
3. Sunpyre – fire-based spell spell. Short-Duration
- Can be extended a little over 30 sec by foci
- Has a 6 sec refresh
Chill of the Dusksage Tender
A situational cold-based spell that can be applied after your third DoT (Sunpyre). This spell requires the use of a GINA trigger to properly time. Second-highest mana-cost DoT
- Deals a long-duration weak DoT initially (for approx 2 min)
- After the initial DoT expires, it will trigger a stronger DoT – Frost of the Duskage Tender
- Frost of the Dusksage Tender – lasts 30 sec with extended foci
If you re-apply this DoT before the trigger DoT is applied, you are essentially wasting mana. It only works best on a boss mob of some sort that stays alive for several minutes. The goal is to re-apply this spell once Frost of the Duskage Tender is triggered.
Due to this spell’s high mana-cost, some druids may consider leaving it out altogether on long raid events. This will entirely depend on how comfortable you feel using it in such cases.
Tenebrous Sunray
This is applied as the last DoT if a mob has Season’s Wrath debuff on it. In this situation, it’s really used more as just a filler DoT. If Season’s Wrath is on cooldown, then it should really be used as the first DoT (really as a debuff). Confusing – I know.
- Adds a flat damage increase to fire-based spells (but not stacked with Season’s Wrath)
- Applies a weak, fire-based DoT
- Lasts a little over a min with extended foci
DoTing Multiple Mobs
For maximum DPS (and depending how well your mana can handle it), you can apply DoTs on multiple mobs. It’s worth gauging how quickly such mobs are dying. One DoT tick is equivalent to 6 seconds. If a mob is dying in under 12 seconds, then some DoTs might be wasting mana.
- Ideally, work from the bottom-up on extended target window
- Apply DoTs on the highest HP mob (not on MA’s target)
- Primary use of Horde of the Duskwigs and Sunpyre
- Depending on your mana, re-apply NSW with any GoM procs
Sustained DPS
Sustained DPS involves nuking while either DoTs are ticking away, or if mobs are dying too fast to even bother DoTing. You can also consider using an AE nuke damage spell in lieu of Blood Roar (refer to the last section of this guide).
General Nuke Sustained DPS
- Remote Sunbolt
- Nature’s Fire (AA)
- Winter’s Wildblume
- Nature’s Bolt (AA)
- Summer Sunpyre
- Nature’s Frost (AA)
- Bloody Roar
Low Mana Cost Sustained DPS
This is a scaled back version to use when you are busy DoTing multiple mobs. Spells like Bloody Roar won’t see much mileage in these cases (as it takes long too refresh).
- Winter’s Wildbrume
- Summer Sunpyre
And any AA nukes as you see fit and depending on your mana.
GoM Procs -> Nature’s Sweltering Wrath
Whenever you proc GoM’s with nukes, always re-apply Nature’s Sweltering Wrath.
AA Nuke Abilities
AA Nukes are used as weave-ins during burns and in sustained DPS
Your Three AA Nuke Abilities
- Nature’s Fire – fire nuke
- Nature’s Bolt – magic nuke
- Nature’s Frost – cold nuke
Understanding AA Nuke Abilities
As a quick synopsis, this is how AA nuke abilities work (at max ranks):
- All cost 4700 mana
- All have a base damage of 60,000 points
- All take 0.5 sec to cast
- All have 15 sec re-use and don’t share the same cooldowns
- All can deal critical damage and also affected by luck (lucky criticals)
- Not affected by any mana preservation/buffs
- Not affected by worn foci items
- Not affected by GoMs and do not proc GoMs
- Not affected by any Twincast abilities/spells
Weave-in DPS for Spell Global Cooldowns
First, let’s discuss what a Global Cooldown (GDC) means. Upon finishing a spell cast, you’ll notice all your spell gems greyed out and unusable for 1.5 sec. This is everyone’s GCD. All activated AA Abilities are exempt from the GCD. Since your AA nukes take 0.5 sec to cast, they are used (aka “weaved-in”) while castable spells are on GCD during burns for extra DPS.
Lag
Unfortunately, lag can affect you and reduce the use of AA nukes. if you are lagging a lot on an event, then you might not make use of them much for GCD purposes. Instead, you’ll be using them as filler nukes for sustained DPS when other nukes are on cooldown.
Full Burn
The main bulk (and burst damage) of your burn is DoT’ing. The rest will be sustaining DPS via nukes in between and re-applying any DoTs that expire along the way.
Pre Burn Tasks
This should be coordinated with your enchanter. The enchanter should be debuffing during the time you are activating these abilities and debuffing mobs yourself. If burning at the start of an event, then you can activate at least the first three tasks below beforehand.
- Click: Silent Casting
- Click: Distant Conflagration
- Click: BP Click (clicky item)
- Click: Blessing of Ro
- Click: Season’s Wrath
Full Burn
- Click: WOLF Social Key to instantly activate: Group Wolf + announcement in group
- Click: BURNS Social Key to instantly activate: ITC + DV + NF + FA
- Click: Nature’s Sweltering Wrath
- Click: Horde of Duskwigs
- Click: Sunpyre
- Click: Chill of the Dusksage Tender (if being used in your spell set)
- Click: Tenebrous Sunray (if being used in your spell set)
… and then go straight into your sustained nuke DPS rotation. You’ll continue re-applying any DoTs accordingly in between once they wear off for the duration of your burn.
Distant Conflagration
This ability has to be activated before Improved Twincast is on you. Otherwise it will give you a blocked message. DC will twincast your Remote Sunbolt 18 times up for 10 min.
- Remote Sunbolt will not use up ITC charges if DC is up on you before ITC
- This means that you can have a total of 39 twincasts, if you factor in ITC
BP Click Item
Breastplate items with a click effect are obtained either through Group Missions or Raids. Due to the fact that the click effect has a cast time, it’s prefered to click it before burning.
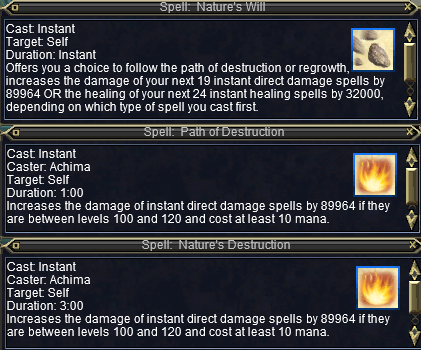
The BP click will apply two buffs on you: Path of Destruction and Path of Regrowth. You will have one minute to cast a direct damage spell and take advantage of Path of Destruction which then applies Nature’s Destruction on you (the other buffs will disappear).
By the time you reach your sustained nuke DPS on a burn, this should be more than enough ample time to activate the increased nuke benefit.
Season’s Wrath
The most important debuff to have on any mob you are about to burn on. At max ranks, it increases the damage of your fire and cold spells between 17 to 25% for 1 min. It is also the reason that Tenebrous Sunray takes lesser priority and used as the last DoT on a burn order.
Chromatic Haze – Enchanter Ability
Chromatic Haze is an enchanter ability that should land on you right after you apply Nature’s Sweltering Wrath on a target mob. This requires coordination with your enchanter. It is also the reason a “CH” Social key can be used asking for Chromatic Haze after you land NSW.
This enchanter ability will increase the spell damage you do off the tick/DoT portion of your NSW spell by 390% (before crit). Given the fact that your NSW spell has an initial DD component and then a DoT component, you want to time this ability to take advantage of your DoT Tick. The DD component will not do as much damage otherwise.
Lesser Burn
Your Twincast spell serves as your basis for lesser burns.
Twincast
This is a level 85 spell obtainable from the Seeds of Destruction expansion. While all ranks grant you 18 secs to Twincast any damage spells, it pays to get a group of friends to unlock the necessary SoD raids and obtain Rank 3.
- Rank 1: Has a 6:00 min recast time
- Rank 2: Has a 5:20 min recast time
- Rank 3: Has a 5:00 min recast time
If you can’t find someone to unlock the raids, or you don’t have the progression done, you can still purchase Rank 2 at least off a player, as it’s a tradable spell.
DoTs w/ Twincast Spell = Lesser Burn
Twincast yields you a greater advantage when used for DoTs, rather than DD spells. This is a similar model to how you full burn. You’ll have 18 seconds to quickly apply all DoTs first. If you’re carrying a full arsenal of DoTs in a spell set, then chances are you won’t even get a chance to touch nuke spells before Twincast wears off.
Coordinating Burns and Lesser Burns
The best way to plan out when to use Twincast is by making sure your group is coordinating burns in advance. If you know you will be using full burns at the start of an event, then you should be using your lesser burns afterwards – or vice versa.
Special Augs
While this guide is not meant to discuss gear matters, it is impossible to neglect three important augs that will do wonders for your mana. These are all obtained from the CotF expansion.
As an example, Splinter of Potency can save approximately 500 mana per cast of NSW. That’s a large chunk of mana savings over having an aug slot filled with a flat mana+ aug.
Bixie Summoner’s Stone
Affects all Conjuration spells (ie: Horde of Duskwigs, Sunpyre and Remote Sunbolt)
Info: https://items.eqresource.com/items.php?id=94657
Splinter of Potency
Affects all Evocation spells (ie: Nature’s Sweltering Wrath, various nukes, Tenebrous Sunray)
Info: https://items.eqresource.com/items.php?id=94659
Tome of Manipulation
Affects all Alteration spells (ie: all heal spells)
AE’ing
I left this part for last, since AE’ing depends on a couple of factors:
- How well your raid tanks/off-tanks can manage multiple mob aggro.
- How well mobs are grouped tightly together.
- How many mobs are available to AE together.
Replacing Roar with an AE Spell (2+ mobs)
Hitting just 2 mobs with a single cast of Heliacal Conflagration will do more damage (and use less mana) than a single cast of Bloody Roar. I usually don’t end up using Roar spells nearly enough on longer-duration, current-content raids due to mana constraints.
Using 2 Targeted AE Spells (4+ mobs)
Druids have a variety of AE spells, but it’s only two spells you want to primarily be concerned with alternating during AE DPS.
- Heliacal Conflagration – level 116, fire-based, targeted AE spell
- Twilight Chill – level 117, cold-based, targeted AE spell
Both these spells will deal damage to an unlimited amount of mobs. As you can see, both these spells are also targeted AE spells. This means that the damage will occur around a radius of a targeted mob. When using targeted AE spells, if you stand too close (or within the radius of the AE) of the targeted mob, you will also get hit by your AE damage.
Additionally, these spells have a 12 second refresh. After you finish casting your second AE, you’ll be waiting at least 8 seconds before you can cast the 1st one again. This means you should be doing other forms of damage during this “wait” period – ie: DoT’ing.
AE Multiple Mobs that Die Quickly
If facing multiple mobs that are dying fast (under ~15 seconds), it will make sense to not waste mana on high-cost DoT spells. You can just cast your AE spells instead. Any GoM procs can additionally be used with NSW, since that DoT only lasts 18 seconds.
AE Multiple Mobs that Don’t Die Fast
You can utilize your DoTs (especially, if you’re burning) first, and use AE spells in between – rather than using single nukes. If you’re not using big burns with ITC, then it can opt to use your Twincast Spell in such cases. Considering AE spells are direct damage, you will also want to make sure you have a wolf up on you and a spire to get as close or at max 100% DD crit chance rate.
AEing Testing with Twincast Spell
I conducted some casting tests to see what I was able to fit in within the allotted 18 seconds of Twincast Spell running. This will assume that you have the following:
- Best spell haste tribute or item available in current content to you
- Cleric Spell Haste Buff
- All focus AAs completed for the spells being used
- Quick Damage AAs completed.
1st Test
The following took me ~14 seconds from initial cast to landing the final spell.
- Nature’s Sweltering Wrath
- Horde of Duskwigs
- Sunpyre
- Heliacal Conflagration
- Twilight Chill
2nd Test
The following took me ~16 seconds from initial cast to landing the final spell.
- Heliacal Conflagration
- Twilight Chill
- Nature’s Sweltering Wrath
- Horde of Duskwigs
- Heliacal Conflagration – used immediately on refresh
3rd Test
The following took me ~18 seconds from initial cast to landing the final spell.
- Heliacal Conflagration
- Twilight Chill
- Nature’s Sweltering Wrath
- Horde of Duskwigs
- Sunpyre
- Heliacal Conflagration – used immediately on refresh
Theory Testing vs Reality w/ Twincast Spell
Which of these spell orders work best during an 18 sec Twincast really boils down to the fact that you can’t control server lag, server latency (the distance between your computer and the game’s server location), and global cooldowns. There have been few cases where I was successfully able to land all 6 spells from the 3rd Test order, while in most other cases I was unable to squeeze out more than 5 spells.
I prefer trying to use 3 DoT spells with 4-5 mobs. This has to do with the fact that I can’t ignore the extra damage boost from Enhanced Ruin AA. If there are 6 or more, then it “might” make more sense to place a higher focus on dropping a DoT to get in 3 AE spells (rather than 2).