Newbie: User Interface
After you create a character and enter the world, the first thing you see… a simplistic User Interface. The two main things you need to fix are your chat windows and maps – you’ll thank me later! This is not meant to be a comprehensive guide on the UI. There are many advanced features which are outside of the scope of teaching a new person how to navigate the simple parts.
At a Glance
Upon entering the world from the Character Creation screen, the first thing you see is this.
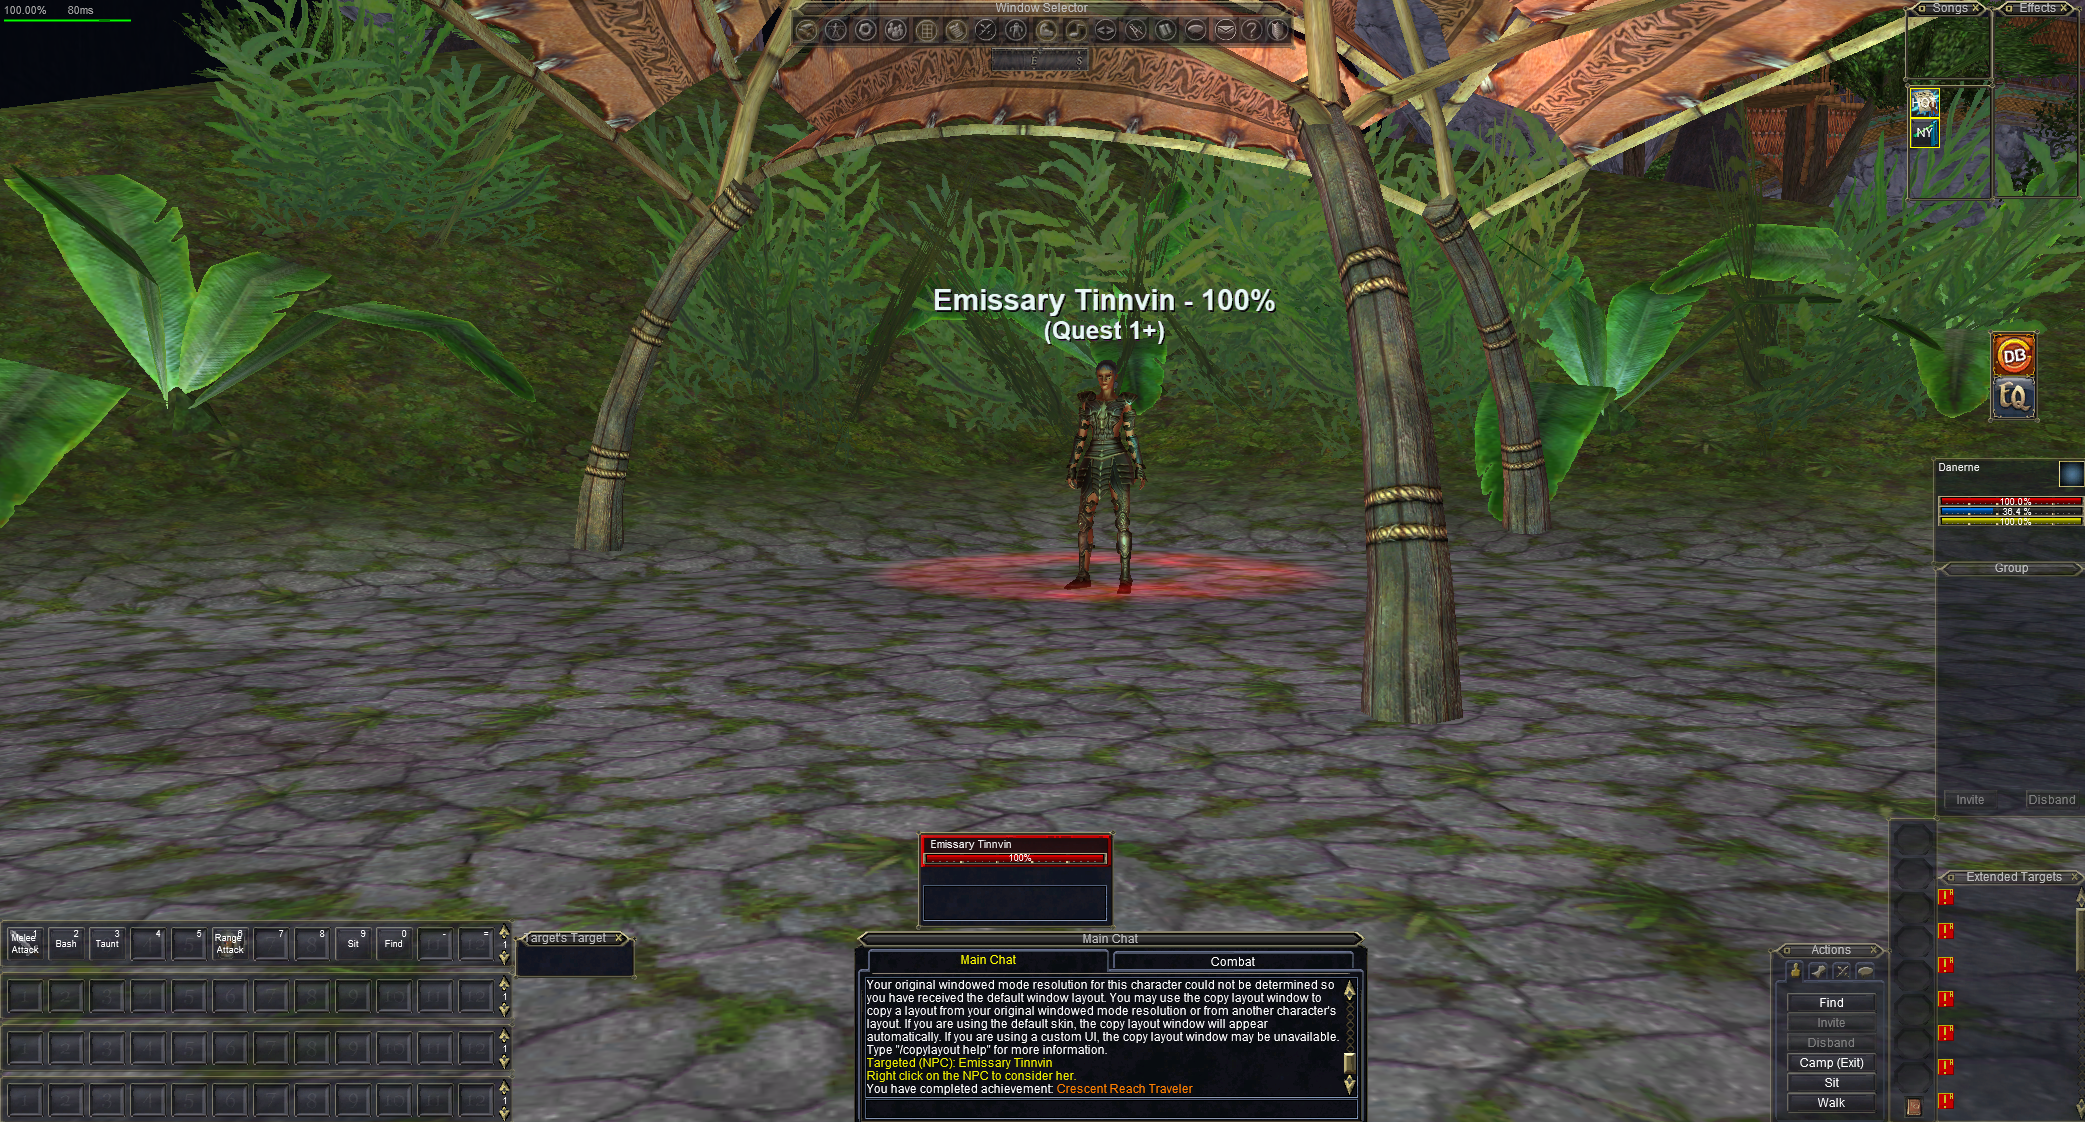
In the above example, a level 1 Shadow Knight’s UI is seen. Some UI pieces will differ depending on the class you create. For example, a Warrior will not see a vertical Spell Gem bar (warriors don’t cast spells).
If you are using the Tutorial, you will notice that some of these elements are not on screen. The Tutorial will guide you further by unlocking pieces of the UI along the way.
All UI Pieces Can Move
Unlike other games, you can move virtually all the UI window pieces you see on your screen. Most can also be resized.
Should I Download a User Interface off a Site?
Not just, yet – no. In fact, it can make matters worse. A lot of player-submitted UIs (basically everything you find on the internet) can be riddled with errors or be out of date. If you install an outdated UI, your screen will show errors messages and even crash your game.
It’s best to first explore the world, see how the existing UI works, and then customize it slowly along the way to fit your needs. For most basic needs, all you need to do is simply enlarge and reorganize the default UI window pieces themselves.
Part 1: Main UI
We’ll go over the basic UI pieces first. Some of the pieces are grouped together for discussion.
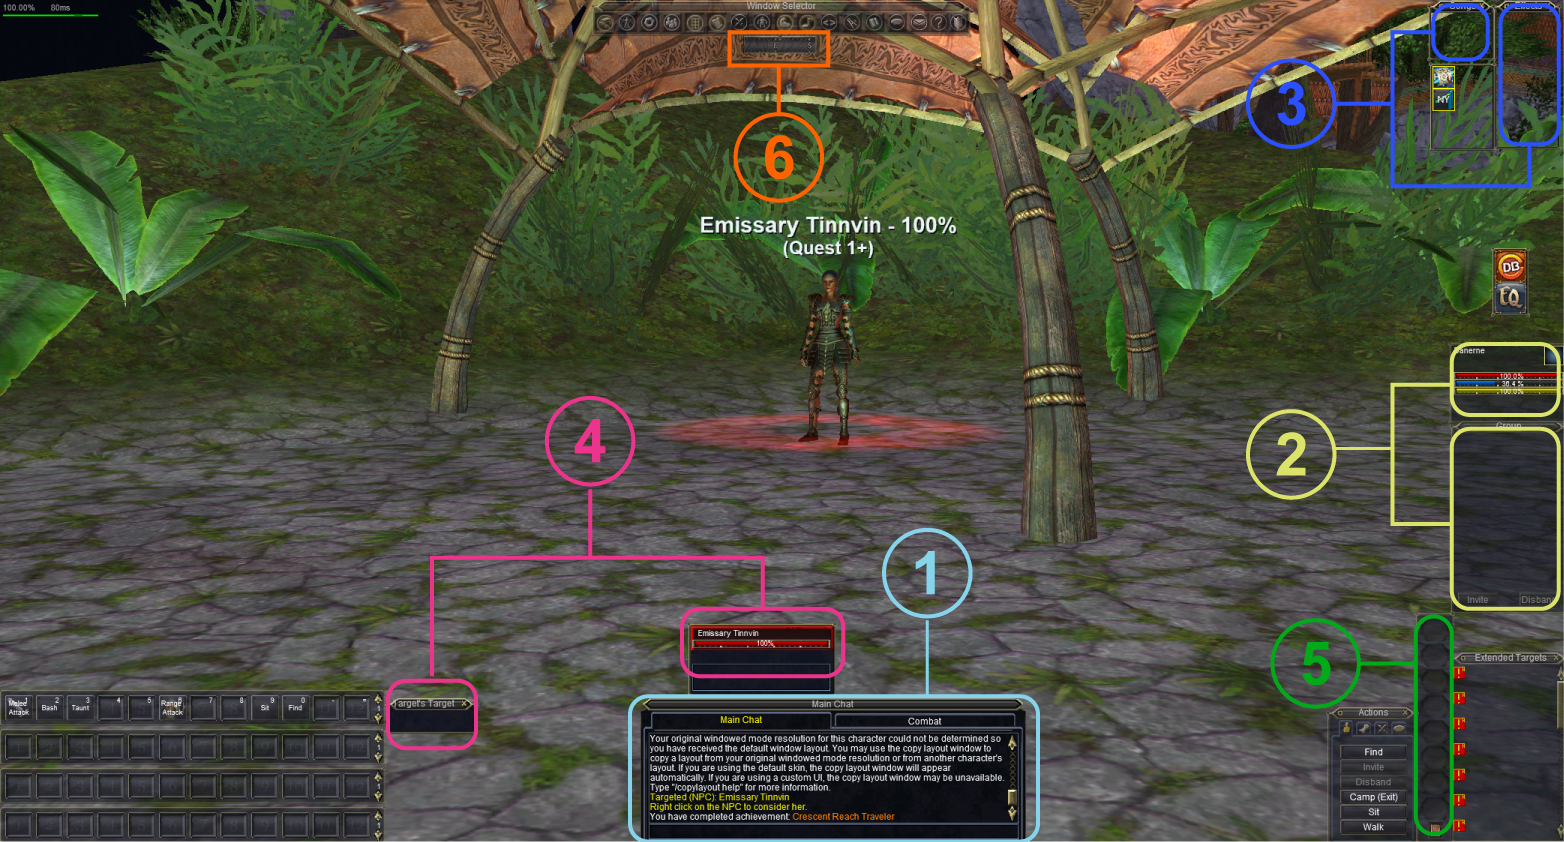
1. Chat Window
In the bottom-middle part of your screen is a single window piece labeled “Main Chat.” It contains two tabs inside which can be thought of as “sub windows.” One is also labeled “Main Chat” while the other is labeled “Combat.” Clicking between the tabs, you’ll see different lines of text being filtered into each tab.
The game is already filtering all combat spam into your “Combat” window, so there is no need to mess with it. However, in the next chapter of this guide it will be imperative to create another window to filter other types of text.
2. Player and Group Windows
On the left side there will be a Player and a Group window.
The Player window will show you a health bar (in red), a mana bar (in blue), and an endurance bar (in yellow). The bars you see here will depend on the class you are playing. The group window will show similar bars for players you are grouped with.
3. Short Duration and Long Duration Buff Windows
Wedged into the upper-right corner of your screen, are the short duration and long duration buff windows. These are sometimes referred to as song and regular buff windows. These window pieces will eventually need to be enlarged, as you will soon realize that they won’t show you the myriad of buffs that players may cast on you.
3. Target and Target’s Target Windows
Above your Main Chat Window, you’ll see a Target window. Not only does the Target window show you what you have targeted, but it will also show you the buffs (or debuffs) that your target might have. Currently, NPC targets can have up to 200 total buff slots shown. So at some point, this window piece will need to be enlarged.
The Target’s Target window is found further to the left of the Main Chat window. This one should be self-explanatory.
5. Spell Gem Window
All classes that can cast spells will have a vertical Spell Gem window available. This is the area where you can load the spells you intend to use – up to the available amount of spell gems.
6. Compass Window
The compass (which is fairly small), is found near the top of your screen. This will be useless at low levels unless you have maps – another subject that will be tackled later.
New Chat Window
Before we discuss the rest of the visible UI components on your screen, we need to address the chat window. If you select to play on a new TLP server, you’ll be inundated with a sea of social chat going into the Main Chat window the moment you log in. Most players use at least three different chat windows for reference. I personally use at least 4 windows.
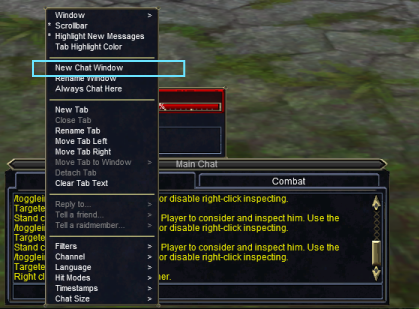
The first step is to right-click the top of your existing Main Chat window. You’ll see a drop-down menu appear. From here, select the “New Chat Window” as shown.
As soon as you do this, another Chat window will pop up, most like labeled as “Chat 2.” It may appear in a different part of your screen. You can move it and resize it as you wish.
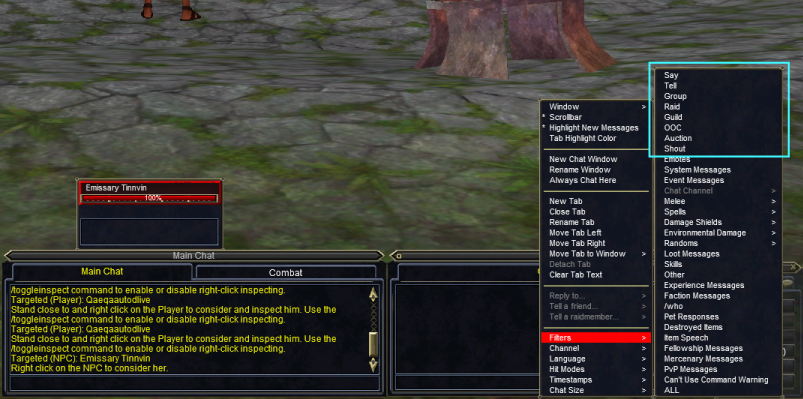
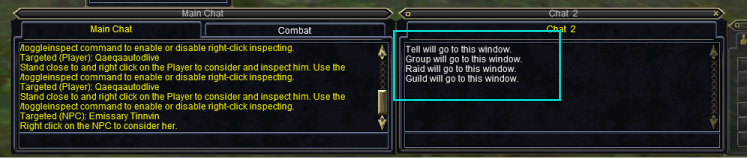
I moved and resized the new chat window to the right of the existing one. But nothing will be filtering into it unless some filters are set. I leave it up to you what you choose to filter. You can also create new “tabs” first into the new chat window if you want to compartmentalize where each new filter goes into the new chat window further. In such cases, you will need to create the tabs first, and then right click on the individual tabs to see the same filter menus.
I boxed a group of general social filters in the above example. If you join a guild or groups with very lively chatter going on, you’ll definitely want to filter those chats first. Each filter will have to be applied individually. You will see a confirmation message as you apply each one.
Part 2: Main UI
The remaining visible components of the default main UI will be discussed now.

1. Actions
The Actions window contains 4 small tabs along the top to give you quick ways to access common commands, skills and macros. You can also create and save custom macros here.
2. Hotbars
By default, four Hotbars are shown on screen. There are a total of 11 you can keep up. Here, you can drag and drop commands, spell gems, skills, combat abilities and custom macros – among many other things. For starters, Hotbar 1 already has several commands populated on it from the Action window.
3. Window Selector
The window selector will allow you to open and close commonly-accessed windows – some which are not visible by default like the Map window. It will also allow you to toggle on and off some of the existing, visible window pieces already on your screen.
Once you get the hang of playing EQ, the window selector will become redundant. All options found there will be access via the “EQ” button or in-game keypress commands instead.
4. DB and EQ Buttons
The DB button will pop up Daybreak’s “Cash” store. Here you can use points you accumulated (acquired by being a paid, monthly subscriber) or buy points with real money to purchase items.
The EQ button contains all options to bring up individual UI window pieces and more. As previously mentioned, the Window Selector will become redundant as you familiarize yourself more with the menus contained with the EQ Button.
Once you feel comfortable letting go of the Window Selector, you can ALT + W to toggle it off.
5. Event Announcements
You’ll periodically see icons pop up here. These are event announcements that let you know of any on-going, special things happening in EQ. When clicking on any of the icons shown, a window will pop up describing any new happenings. Sometimes, exp bonuses or hot zones are announced here.
6. Extended Target Window
By default, any mobs you have “aggro” on will populate the slots of this window. if you are in a group, you’ll see this window also populate with aggro’d mobs by party members. You can individually customize the slots here further to automatically show you a main assist target, a player target and so forth.
Maps!
The Map window is not toggled on by default. There are three ways to bring it up:
- Use the Window Selector
- Use the EQ Button
- Or the easiest…. click the “M” button your keyboard
This will probably be the most frequently accessed window for a new player. If you play on a decent-sized screen, you might consider keeping it up permanently. You can move it around and resize it to fit in the corner of your screen.
I typically resize and shove the Map window in the upper-left corner of my screen. You can also adjust its transparency settings among other things (just like you can do with other window pieces) by right clicking on the window.
But.. There are NO MAPS!
And… this is why we are here. EverQuest did not implement a map system until 2003. On top of that, all maps are player-made. Fear not, there are popular map-packs that exist online. These I do encourage you download and install.
Brewall’s Maps
The quickest solution is to do what 99 percent of other EQ players do, and go download Brewall’s maps here:
You can minimize EQ while you do this. After you download the zip file, extra the folder to your Everquest -> Maps directory as shown below.
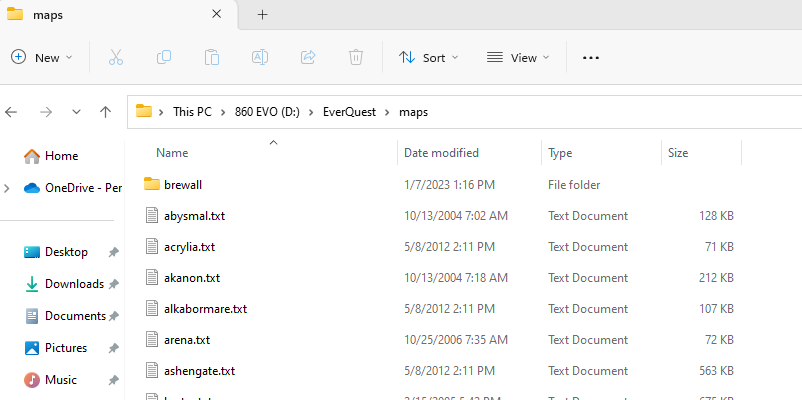
The main takeaway is that the entire map-pack should be in its own subfolder within the map folder. This way EQ will not accidentally overwrite anything.
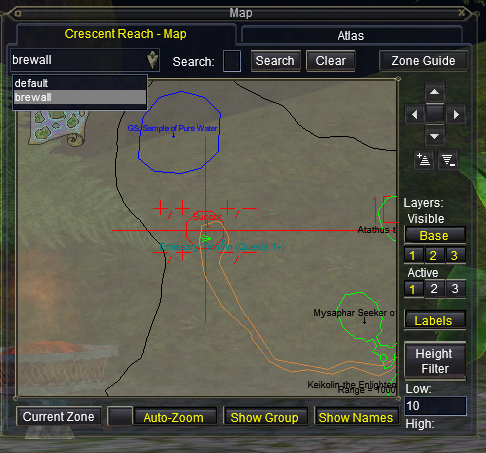
Selecting the Map-Pack in Game
You can now bring up your EQ game and select the map-pack. The map-pack will be the “folder” name for selection.
Options Window
We’ll finally discuss the Options Window. This is a window you’ll probably be referring back to multiple times to further refine in-game settings. You can access it in two ways:
- Click the “EQ” Button and scroll down on the main menu
- Or, Hit ALT + O on your keyboard
There are wealth of options here split by tabs. It pays to study them in your free time. We’ll only go over a couple of ones that give some people a hard time.
General Tab
Two general options that new players oftentimes struggle with are enabling/disabling “Tell Windows” and “General Channels.”
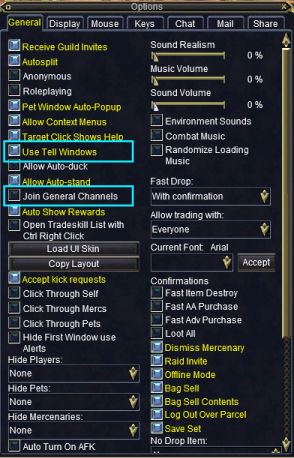
By default, Tell Windows are enabled and General Channels are disabled.
Tell Windows
Each time a different player sends you a /tell (aka a private message), a new chat window will pop up with all conversation for that player. Some players like this option, while others may not. If you have multiple people sending you messages at the same time, this can be problematic.
General Channels
As soon as you activate this option, you’ll see yourself automatically joining several chat channels. When you disable it, you’ll automatically leave those same channels. These channels will default to your Main Chat window unless you set them to filter into a different window.
Keys Tab
This tab controls all your keypress settings. All keypresses are compartmentalized by category which can be selected via the “Select category” dropdown menu as shown below.
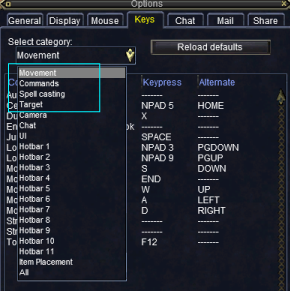
For the most part, new players that want to familiarize themselves with options already set in game, should access the first four categories.
Movement
such as your movement keys using the traditional W, A, S, D keypresses found in other games.
Stats in Green: Hint Hint
If stats are colored in green, there are assigned points already into them. This is also a good indication to new players as to what stats are primarily important to the class they select.
Should I Change the Points?
New players that are not sure what to do should probably leave the stats alone. They were automatically assigned to you for a good reason.
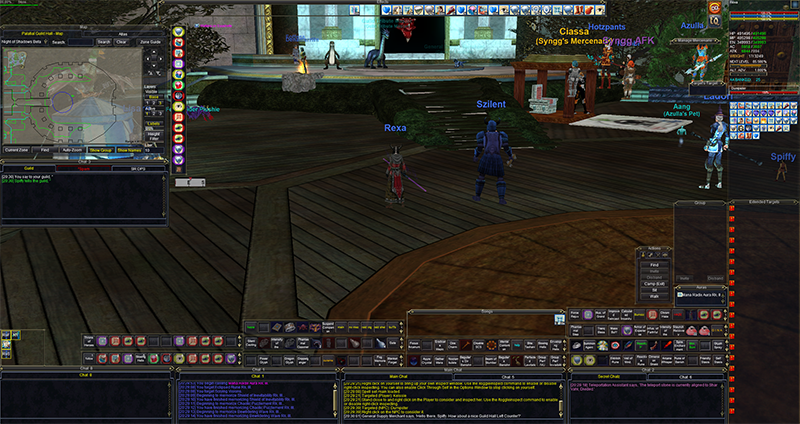
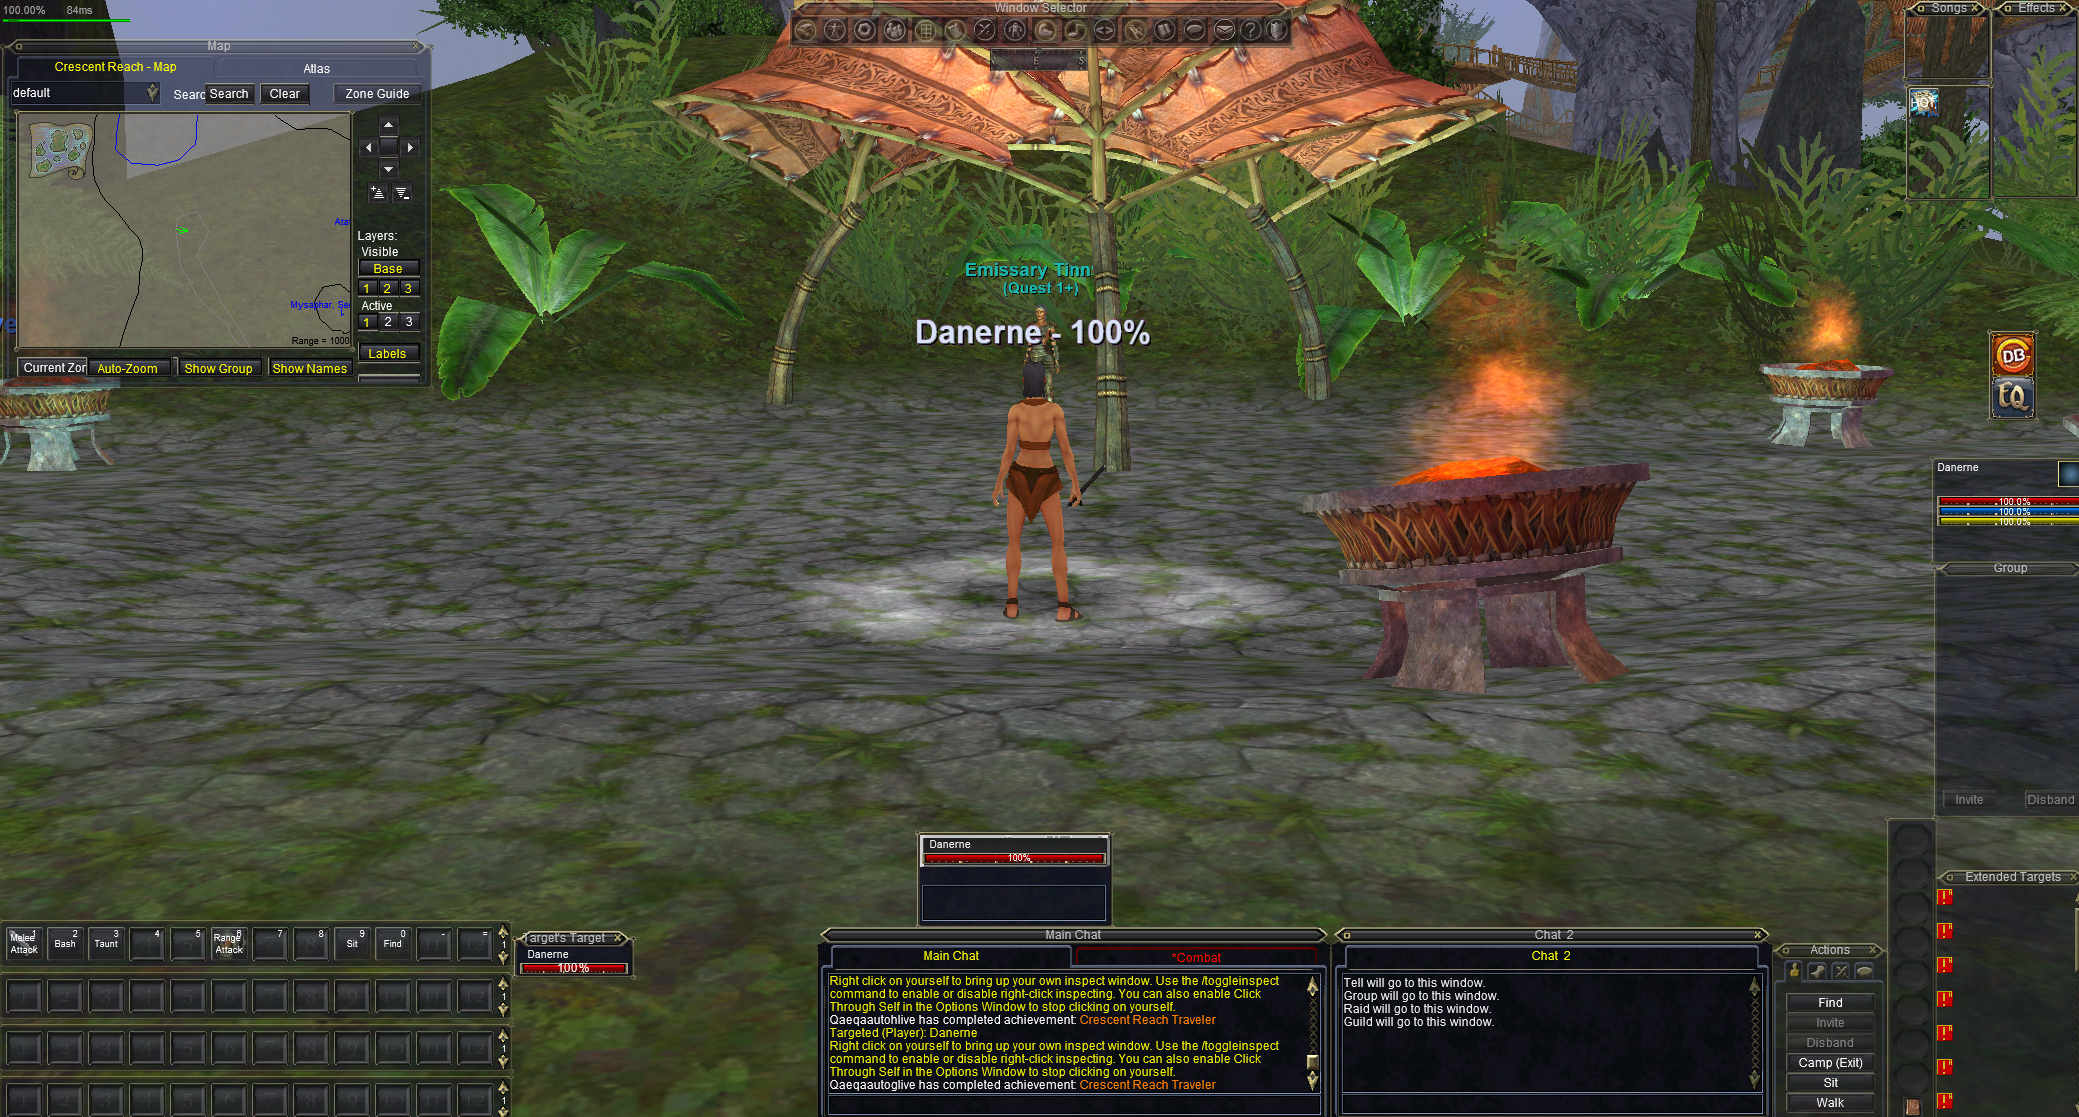
Example
Below is an example of my Enchanter’s UI setup. The only “slightly” customized pieces I am using are for my Player Window, Compass and spell icons. Beyond that, it’s relatively “default.” All I did was enlarge and re-organize certain window pieces and create additional chat windows. At higher levels (most likely at level 85 and higher), you’ll find yourself needing to use all 11 Hotbars – which you can see on my screen.