
Newbie: The Basics
This guide will go over some of basic commands, functions, windows and other areas of immediate interest to a newbie player.
Basic Commands
There are a couple of basic keypresses and commands that you’ll be using throughout Norrath in your journeys. If you recall from the User Interface section, you can access all the commands, target keys, etc by opening up the Options window (via Alt + O), and going to the “Keys” tab. Here are some immediate ones to look at:
Default Keypresses
- Q – This is your attack toggle on/off button to melee a mob at close range
- C – Allows you to consider a mob, seeing it’s level and difficulty
- I – toggles on/off your Inventory window
- M – toggles on/off your Map window
- B – toggles on/off your bandolier window
- V – toggles on/off your Alternate Advancement window
- R – reply back to a /tell you received
- T – automatically prepare a /tell
- H – “Hail” a player or an NPC
- X – toggles on/off ducking
- Spacebar – used for jumping
- CONTROL + F – Brings up a “Find” Window to search for NPCs/PCs in zone
- ALT + C – Brings up Combat Abilities aka Discipline window
Default Typed-Out Commands
- /sit – used to med or regenerate HP, Mana, END at a higher rate
- /camp – used to exit the game
- /tell – used to send a private message to another player
- /gu – used to send a message to your guild chat
- /g – used to send a message to your party members (if in group)
- /merc – brings up the Mercenary Window
- /charinfo – used to check your “bind” point
Inventory and Items
By clicking the I button on your keyboard, an inventory window will pop up. There are a variety of character stats, gear slots and inventory slots to be found here.
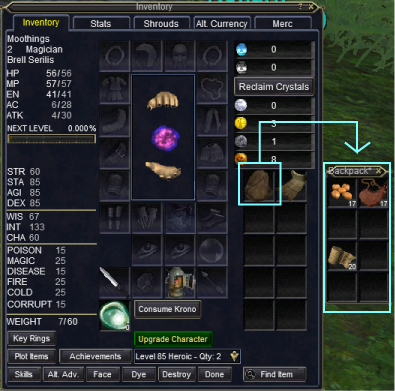
Inventory Slots
You have ten, top-level inventory slots where you can hold bags and items. Newly-created characters will have a bag in one of these slots. By right-clicking on the bag, you will see another window pop up with its contents.
Food and Drink
By default, you are given a stack of 20 food items and a stack of 20 drink items. Food and drink will get automatically consumed from your inventory at certain time intervals in game. When you run out of food and drink, you’ll see spam indicating your are hungry and thirsty – something you want to avoid.
Basic food/drink provided to your character simply satiates your hunger and thirst. At higher levels, you can buy or create (via tradeskills) food and drink items that additionally give you stats. In short, as a new player, you’ll want to replace the newbie food given to you with large stacks of food and drink to not have to keep worrying about it.
Bandages
By default, you are also granted a stack of 20 bandages. These are meant to be used with the “Bind Wound” skill which will later be discussed here. Each time you use the Bind Wound skill, you consume a bandage. You’ll also want to make sure to keep up a large amount of bandages in order to “skill up” this skill along the way. It helps heal you when you’re below 50% HP.
Try to Get Bags!
One of the main things you want to focus on is acquiring bags. There are many drops you’ll be collecting along the way, and you’ll find yourself running out of room quickly at lower levels.
Character Gear Slots
You can equip up to 21 items if you count out all the available gear slots. It’s normal for lowbie players to not be fully geared. If you have an empty slot, it’s in your best interest to equip anything (even crummy drops) you can get your hands on and wear at early levels.
As a side-note, the Tutorial can get you almost fully geared with appropriate stat gear for your class. Something to consider.
Attacking Mobs
Players starting at level 1, regardless of class, will find themselves meleeing (and taking melee damage) more than anything up to level 15 at least. This is a common theme with all MMORPGs. If you’re playing a caster class, you’ll barely have any mana to cast a lot of spells, so all classes start off on equal footing so to speak.
If you’re a caster, you can open up combat by targeting a mob and casting a damaging spell on it. The mob will come rushing you. At that point, you’ll toggle attack on (via the Q button), and cast any spells in between. You can keep attack on while casting spells.
Always Melee Mobs
Regardless of level, or if you’re in an exp group, always try to melee mobs where possible. It helps level your attack skills (1-hand blunt, 1-hand piercing, etc), and it also helps level your offense and defense skills. If you skip leveling these skills, you’ll find them much more difficult to level up at higher levels.
While melee classes are guaranteed to keep leveling their offense and melee skills, casters need to have their defense abilities leveled up – it helps them mitigate damage better in the event a mob strikes them.
HP / Mana / END
As you’re attacking mobs, casting spells (if applicable) or using special combat abilities (if melee), you’ll need to keep an eye on your Player Window.
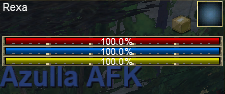
Your lifebar (red bar) will indicate the amount of hitpoints you have. As you take any type of damage, you’re life bar will go down.
Additionally, the more spells you cast, the more mana (blue bar) you will use. You’ll notice the blue bar going down. Same goes for the endurance bar (yellow) when using combat abilities/skills as a melee class.
Run Out of HP = You’re Dead
It’s a simple concept. You run out of HP and you die. If you play some type of a healing class (ie: Cleric, Druid, Shaman, Ranger, Paladin), you’ll be using your mana by casting spells to hopefully keep up with your HP bar.
Run Out of Mana = No Spells to Cast
if you’re a class that can cast spells, you’ll find it difficult to land higher damage on mobs or heal yourself (if capable of healing). You’re best bet is to continue meleeing and hope the mob dies.
Run Out of Endurance = No Combat Abilities
If you’re a melee, hybrid or tank class, you won’t be able to use any combat abilities once you run out of endurace.
Resting State = Allows You to Regen Faster
After you finish combat, you’ll notice a timer in your Player Window. This timer should last for about 30 seconds (it will last longer in a raid instance).
![]() This icon simply means that you can enter a resting state once you /sit
This icon simply means that you can enter a resting state once you /sit
![]() This icon means that you are in a resting state, and are regenerating your HP, Mana and Endurance at an accelerated rate
This icon means that you are in a resting state, and are regenerating your HP, Mana and Endurance at an accelerated rate
Finding Destinations
Unlike other games, you are not married to questing at lower levels – unless, you are doing the Tutorial (which is strongly recommended). Completing quests can give you experience and/or items. Unfortunately, outside the tutorial, there is no clear path on where to get quests, nor what NPCs you need to seek out.
Using the Find Window
The Find feature can be accessed in several places including your Actions window or by clicking CONTROL + F on your keyboard. This will bring up a window of all NPCs you can interact with in zone, and the category they fall under. If you are grouped up with other players, you will also see them listed here to search for them, if you are separated from them.
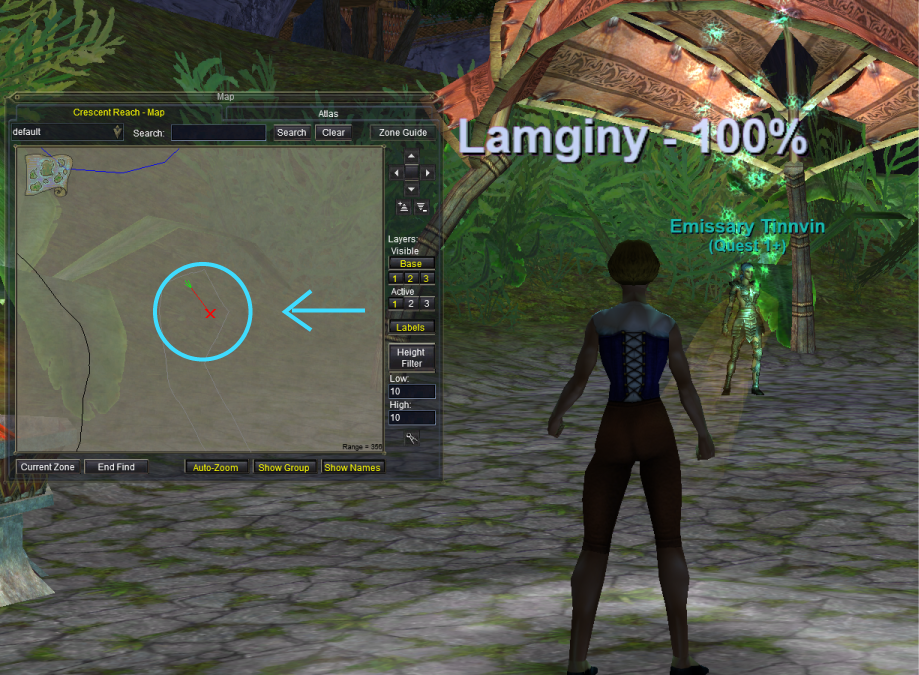
Find Works Best /w Maps
Upon clicking an item in the Find Window, you’ll see a golden path created in front of your character that leads you to the destination. Unfortunately, this is not a perfect mechanic. In some instances, the path doesn’t work correctly, can lead you into walls or off cliffs, or not work altogether (ie: you get a message with “Mysterious forces prevent you from finding your destination easily.”).
The good news is that even if the Find feature path doesn’t work as well as intended, a red “X” mark will also be placed on your map. This serves as a backup in case the find path is bugged or not working out well for you.
Categories of NPCs
Some categories should be self explanatory. Here are all the main ones of interest:
Banker – Used to access your bank. You can store items that you don’t need to carry on you, but that you wish to retrieve at a later time.
Merc Liaison – If you are able to hire a mercenary, these are the NPCs where you can purchase or “hire” them. Mercenaries are player-controlled NPCs that can be used for healing, damaging and tanking – especially, if you have trouble finding players to fill in those roles.
Parcels – Anything with “Parcels” in the category name are NPCs that you can use to send items or money to other players. Some of these NPCs will double as vendors as well.
Melee Augments – If you’re starting out on a TLP, or at level 1, these are vendors you can use to purchase augments for weapons. Melee augments will give your weapons extra perks, such as aggro, extra procs/damage, etc. You most likely won’t be concerned with purchasing augs until around level 20 (and you have enough in-game currency).
Melee Tomes – Vendors that sell melee combat abilities (aka disciplines)
Spells – Vendors that sell spells and additionally may specify the class in their category name.
Soulbinder – These are NPCs that will “Bind” you at their location. if you die or use a “Gate” spell, you will be returned back to the Bind location you set. Melee classes will be most concerned with using Soulbinders as they are not capable of binding to a location without one. Caster classes will eventually be able to bind themselves between levels 10 and 14 (depending on class)
Zone Connection – You can also find zone connections if you are having a hard time in maze-like places using maps alone.
Abilities and Skills
By default, some abilities and combat-related actions you can use are placed on Hotbar 1 already. Some of these will look different depending on the class you are playing. We’ve briefly touched upon how all classes can simply auto-attack a mob in the beginning (via the Q button), but you will need to access other combat-related commands.
Actions Window
The Actions window was briefly discussed under the User Interface guide. Here you will find all basic skills and abilities – and some which are NOT on Hotbar 1. There are 4 tabs at the top of the Actions Window. Any of the options on any of these tabs can be left-clicked and dragged to your Hotbars for easy access.
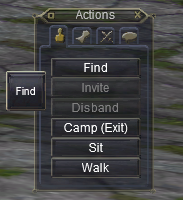
Actions: Main Tab
The main tab has common commands. Such as Find, Sit and Camp. Considering most players keep up the Actions Window, at some point you can eliminate these off your Hotbar 1 and just press on them directly from this section instead, and to free up room.
Actions: Abilities Tab
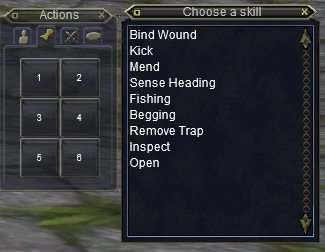
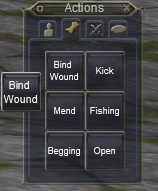
The Abilities tab is where you will find a lot of actions that are not on your Hotbar 1. When you initially access this area, you will see empty buttons labeled 1 through 6.
If you click on a button, a skill window pops up where you can populate the button with a selected skill. Some of these will be class-specific skills. In the above example, a monk will have access to the Kick and Mend abilities.
Bind Wound – this is a noteworthy skill that all classes receive. It is also a commonly overlooked skill. This skill is extremely useful at starting or low levels, allowing a player to “heal” themselves with bandages (provided that you have them in your inventory). It is a skill that also needs to be “leveled” or skilled up. It’s a good idea to probably drag this button onto a Hotbar to skill it up along the way.
Actions: Combat Tab
The Combat tab will show you actions that can only be used for combat. Some of these will appear redundant, since they can also be found in the Abilities tab. However, you will see buttons created already for Melee Attack (which is also the same as your auto-attack key), as well as ranged attack. Ranged attack will only be available to classes that can use the skill.
Actions: Socials Tab
This area contains all social keys, also known as hotkeys or macro keys. It is broken down further into ten pages you can scroll through, The first page will show you common social keys that you can use.
On pages 2 through 10, you can create your own social keys. Some players will use these as macros to incorporate several skills or commands to activate at the same time, rather than pressing each button individually. You can do a search online or read a class guide on what common macros players use.
Disciplines and Spells
If you select to play a melee, hybrid or tanking class – you will have access to a Combat Abilities window. These are also known as Disciplines. Additionally, classes that cast spells will automatically have a Spell Gem bar shown in their main UI. Both Combat Abilities and spells require purchase of melee tomes and spell scrolls from vendors.
Combat Abilities (Discipline) Window
The Combat Abilities window is not shown by default to classes that can use disciplines. You’ll have to hit ALT + C on your keyboard to bring it up. When starting at level 1, there will be no available abilities. You will have to purchase “melee tomes” from class merchants or melee tome vendors to “learn” and use them.
These act similar to the skills found under your actions window. You can populate up to 8 buttons with combat abilities, and you can also drag hotkeys of them directly to a Hotbar.

In the above example (using my level 60 warrior on a TLP server), you can bring up a list of all disciplines by clicking the “S” button from the Combat Abilities window. These can all be sorted by Name or Level.
These are all activated skills that last a specific duration. Some of these skills may share the same timer, so you will need to learn what and when to use.
Spells
Unlike Combat Abilities, all classes that can cast spells will automatically have a vertical Spell Gem bar visible on their screens. At least two spells will also be available and populated in the spell gems. All other spells will need to be purchased and memorized.

There are two ways you can access all spells you have “scribed,” and “memorize” them (aka populate them) to your Spell Gem window.
Option 1 – By clicking the icon at the bottom of your Spell Gem window, a Spell Book will appear where you can manually search through all spells you have scribed, or learned.
Option 2 – By right-clicking any available/open spell gem icon, a menu will appear with categories and sub-categories to browse and select the spell you want to memorize. Eventually, this will become the easiest way to quickly access spells rather than going through endless pages in a Spell Book.
Saving Spell Sets
Once you finish memorizing any spells you intend to use on your Spell Gem bar, you can refer back to this set of spells by saving it as a Spell Set. By right-clicking the same icon at the bottom of your Spell Gem window, you’ll see options to load, save and delete spell sets.
At low levels, you’re limited to only 8 spell gem slots. As you gain more spells along the way, you will find it more and more difficult to swap out of spells for different occasions (ie: buffing, healing, summoning pets and pet buffs, etc). You can save multiple spell sets and name them as you wish. This will save you time from searching for them.
Using Hotbar 1 for Abilities and Spells
Hotbar 1 is your primary bar. By default, your keyboard keys “1” through “=” are mapped out to utilized buttons 1 through 12 from this bar. This makes it easier to activate any abilities or cast spells with a single key rather than mousing over to click.
Spells gems of your choosing can also be dragged directly to Hotbar 1. Simply left click on a spell gem (which has a spell memorized) and a hotkey will appear with the spell.
![]()
In this example, a newly-created level 1 Cleric already has a mix of abilities, commands and spells on Hotbar 1. Button 3 and Button 4 contain spell gems. These are spells that can be cast by either pressing the corresponding “3” or “4” buttons on your keyboard.
How you wish to populate these buttons will be left up to you.
Pets
Classes that can control pets will see a Pet Window pop up as soon as a pet is summoned. Some classes can additionally charm mobs, and a Pet Window will also pop up in the same manner for them. Not all classes get pet spells at the same levels. For example, Enchanters and Magicians will get spells allowing them to summon controlled-pets at level 2.
Summoned Pets Require Reagents
Most summoned pets will require you to have reagents in your inventory. These are items that will get consumed upon summoning/casting a pet. Beastlords appear to be the only pet class that don’t require reagents to summon pets.
- Enchanter – needs a tiny dagger
- Magician – needs a malachite
- Necromancer – needs a bone chip
- Shadow Knight – needs a bone chip
Reagents are all stackable. This means you can purchase them in stacks of 100 at least. The annoying thing at low levels is that the spell vendors that sell you summoned pet spells don’t necessarily sell the reagents for them. You’ll have to check general merchant NPCs for them.
Pet Window
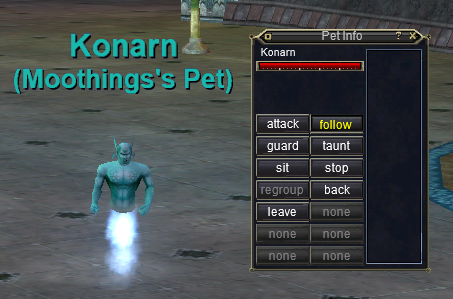
Upon summing a pet, a Pet window will appear. At low levels, you’re granted all basic pet commands. You can either drag these command hotkeys onto a Hotbar or just press them directly from the window. Advanced commands will be unlocked at higher levels through alternate ability points.
Most pets can be given weapons and equipment. They can also be buffed, but they will not receive group buffs until alternate ability points are acquired at higher levels.
AA Abilities
Alternative Advancement (AA) Abilities can be thought of as an extension of your character and skills. The AA Ability system was introduced with the third expansion, Shadows of Luclin. It also used to only be available for access starting at level 60. This has changed, and now certain AA abilities are available (auto-granted) to all players, starting at level 1.
What are AA Abilities?
In a nutshell, AA abilities can passively or actively affect your player. Passive abilities give your character bonuses or advantages to existing skills, spells or other combat-related activities without needing to press additional buttons. Active abilities require you to create a hotkey and place it on your Hotbar for use.
Activated AA Abilities
AAs that need to be activated will require you to create a hotkey for them. The hotkey option will be greyed out for any passive or unavailable AAs.
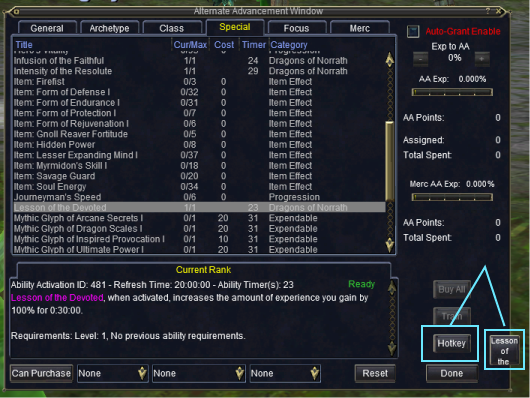
Once you click on the “Hotkey” button for an activated AA, a button will appear which you can then place on a Hotbar.
AA Window: Special Tab
Under your Special Tab, you will see there are several AA abilities that you can use starting at level 1. if you are on a TLP, the devs will allow some of these for use at their discretion. Some of these AAs were previously known as “Veteran AAs” but later were made available to all accounts regardless of subscription time.
A couple of commonly-used “vet AAs” are:
Armor of Experience – when activated, places a buff on you that reduces the amount of melee damage you take from enemy mobs.
Expedient Recovery – when activated, summons any corpses you have from all zones, and restores 100% of experience per corpse.
Infusion of the Faithful – when activated, places a buff on you that increases all general stats, all resistances, and your movement speed.
Intensity of the Resolute – when activated, places a buff on you that increase all healing and damaging spells (for casting-classes) and increases damage from melee attacks.
Lesson of the Devoted – when activated, places a buff on you that increases all experience gained by 100%
AA Window: General Tab
At level 5, all characters are able to use the Origin ability. This ability will return you back to your starting city. You can check your location via the /charinfo command.
Mercenaries
Mercenaries are player-controlled NPCs that can fill in a “needed” role when you can’t find group members. These were introduced in game with the Seeds of Destruction expansion.
A merc requires a one-time purchase to acquire it. All players start off with two available merc slots (meaning you can purchase up to two mercs). Mercs require an “upkeep” fee which is deducted every 15 minutes from you while a merc is active. These fees will increase with level.
Requirements
Mercs can be hired at level 1. EQ made changes to the merc system by simplifying their requirements and categories. Quests are no longer needed to obtain Journeyman level mercs. However, mercs may not be available on TLP (progression) servers until the Seeds of Destruction expansion unlocks. This can change at the developers’ discretion.
Hire and Upkeep Cost = Free at Level 1 thru Level 10
That’s right. It’s free to hire a merc between levels 1 and then. Additionally, there are no upkeep costs to use a merc between levels 1 and 10. As you increase in level, so will your merc. The fees start out small and then incrementally get larger per level. At around level 100, the upkeep cost is about 100 plat every 15 minutes.
Where to Hire/Purchase a Merc?
You can hire (aka purchase) a merc in any starting city or in Plane of Knowledge (zone unlocked with PoP expansion). Simply use the Find window, and look for a Merc Liaison.
Mercenary Roles
There are 4 basic merc roles you can purchase:
- Caster DPS – a wizard merc (will DPS with spells from a distance)
- Healer – a cleric merc (can heal, buff and resurrect players)
- Melee DPS – a rogue merc (will melee DPS up close)
- Tank – a warrior merc (will taunt and take damage for you)
Keep in mind you can only purchase up to two mercs at the beginning. Any additional slots will require progression, DB store purchase, or other to gain additional merc slots. If you play a tanking class, it makes sense to purchase a healer merc and some type of a DPS merc. You can only keep one merc active at a time though.
Apprentice vs Journeyman Mercs
After EQ overhauled the merc system, all mercs were consolidated into two categories. Apprentice and Journeyman. If you are a Free to Play account, you can only purchase Apprentice mercs. These are watered down mercs with limited abilities in contrast to Journeyman mercs. For example, a Caster DPS merc will offer you better options, such as “burn” stances, if it’s a Journeyman.
If you are a paid subscriber, always purchase a Journeyman Merc. They will do better damage, healing and tanking than Apprentice mercs.
Mercenary Window

Immediately after you purchase a merc, a window will pop-up to manage it. You can also open and close this window via the /merc command. In the above example, a Journeyman Healer was hired. We’ll only discuss the Healer for now as it’s the most popular choice for lowbies.
Setting a Stance
By default, you’ll see a stance, highlighted in green, already selected. You can toggle between the stances by selecting the one you wish to use and hitting the “Set Active” button.
The “Info” button will give you a description of each stance in detail to better understand which one is right for you (or the situation at hand). However, more often than not, players typically choose to select a “Reactive” stance for Healer mercs. This forces them to heal regardless of how little damage a player is taking. This can also make up for any lag or spiked damage that a player receives.
Suspending and Unsuspending a Merc
By clicking the “Suspend” button, you can put your merc away. Once a merc is suspended, any upkeep costs will stop. Once the mercs start charging you and upkeep cost past level 10, you will want to suspend your merc so you don’t waste in-game money when you’re not doing anything (or AFK) in game.
If you are in-combat, you cannot suspend nor unsuspend a merc. You have to wait until you are out of combat to use such actions.
Dismissing a Merc
This is different than suspending a merc. It is also why the “Dismiss” button is highlighted in red. If you dismiss a merc, you get rid of it for good. This will free up a merc slot again, and you can purchase a different merc.
Reviving a Dead Merc
Mercs, just like players, can die. You have to wait five minutes to Revive a dead merc. The Suspend button will be replaced with a Revive button instead.
Mercs Can be Geared
By opening up your inventory window via the I key, you’ll see a tab along the top for “Merc.” You can only gear mercs with merc-only gear drops found at higher levels (around 105 or so) in the game. For the most part, your merc will continue to function just fine without any gear until then.