
Enchanter: General Guide
Last Updated 02-18-23: Updated several spell names for the NoS expansion.
For the new player – I only reference most auto-granted AAs in this guide. The exceptions to this are: Beguiler’s Synergy, Illusions of Grandeur, Chromatic Haze, and Gift of Hazy Thoughts – as these are required for spell rotation and burn discussions.
The Basics
Typically, enchanter gameplay goes something like this:
- Crowd-controlling (ie: mezzing, stunning, etc) where needed/applicable
- Tash (resist debuffing) mobs ASAP
- Slow debuffing (if no shaman present)
- Sustain an aDPS spell rotation.
- Burn when Improved Twincast is available.
- Maintain runes on yourself and any relevant group spell guards in between
How Mez Spells Work
All mez spells have some form of resist modifiers and do level checks on mobs. This is why oftentimes you can get away with mezzing mobs before tashing – especially, at max levels. However, rankless (vendor-purchased) mez spells will usually incur higher resists, overall.
As an example (a single-target mez):
- Chaotic Puzzlement – Resist: Magic -10
- Chaotic Puzzlement Rk. II – Resist: Magic -25
- Chaotic Puzzlement Rk. III – Resist: Magic -40
To make matters a little more confusing, AE Mez spells have lower resist modifiers than single mezes. This is why you may notice that they tend to get resisted more often than single mezes.
As an example (a targeted AE mez):
- Bewildering Wave – Resist: Magic -5
- Bewildering Wave Rk. II – Resist: Magic -15
- Bewildering Wave Rk. III – Resist: magic -30
If you spend a lot of time mezzing in static zones, then it’s probably wise to try and obtain rank 2 mez spells at least. You can also resort to using “Flash” and “Glance” types of mez spells (hard-to-resist) spell while leveling. However, they have 1:30 min recast times.
How Debuffs Work
Enchanters have the fastest-casting resist debuff in game – tash. This particular debuff reduces magic resists. Unlike Shaman/Mage malo-line of spells, it takes 1 second to cast and is unresistable. The idea is to apply tash on all mobs quickly to reduce chances of resists for all other debuffs and damage spells that follow. Keep in mind your slow is also magic-based.
How Runes and Spells Guards Work
It may seem obvious at first as to what-is-what when it comes to Runes and Spell Guards, but there is a little more to them upon closer examination of these categories.
Utility Beneficial > Runes – Absorb ALL incoming melee AND direct spell damage, up to a total set amount before dissipating off you.
Utility Beneficial > Spell Guards – Absorb a percentage of a particular type of damage (based on each spell’s descriptions), up to a total set amount before dissipating.
Some guards also act as threshold guards, meaning that damage received must exceed a certain amount aka threshold before the guard actually kicks in and does something for you. Notably, your Shield of Inevitability (lvl 119) is one of such spells.
Spell Specializations
Specializations reduce mana cost for certain categories of spells. In both Group and Raid content, you will spend a majority of time casting damage spells for aDPS than any other types of spells. These are the current specializations for enchanters on Live servers:
Alteration (Primary Specialization) – Affects DoT spells such as Throttling Grip and Mind Vortex.
Evocation (Secondar Specialization) – Affects pure DD spells such as Mindreap.
If you made a mistake and need to reset your specializations, you can always visit Ostorm in the Temple of Solusek Ro, and do his specialization reset quest.
Spell Sets
There are spell sets for different occasions – group missions, solo/molo charming, raid combat, etc. For the most part, the first 9 spell gems should look fairly identical across all spell sets:
- Shield of Inevitability – also used as a fast swap gem for single buffs
- Polyluminous Rune
- Mana Radix Aura
- Edict of Tashan
- Ecliptic Reinforcement
- Mindreap
- Throttling Grip
- Mind Vortex
- Night’s Perpetual Terror – should be maintained on ALL your spell sets
This leaves you with Gems 10 through 13 to use for more specific cases. Some ideas for these:
Grouping in Static Zones:
- Chaotic Puzzlement
- Bewildering Wave
- Dizzying Vortex
- Color Conflagration
General Raiding or Group Missions:
- Chaotic Puzzlement
- Legion of Liako
- Marvel’s Auspice
- Mana Rebirth
Charm Play:
- Chaotic Puzzlement
- Marvel’s Command
- Dizzying Vortex
- Color Conflagration
Pulling for Group:
- Addle
- Bewildering Wave
- Bewilderment
- Instil Mind
Buffs
Enchanters, being a utility class, have access to several popular buffs. If buffing is not on your agenda, you’ll be sorely disappointed playing this class. Expect to periodically receive /tells on raids from newly-resurrected players asking for haste or mana-regen, as well as NPT.
Basic Buffs
Regen > Mana-Regen – Besides the obvious, mana-regen buffs also raise WIS/INT and their caps, and raise mana pools. All mana-using classes (except Necromancers) benefit from these buffs. While Bards do not benefit from the mana regeneration component, they still benefit from the increased INT cap and increased mana pool components.
Utility Beneficial > Haste – Buffs that increases attack speed, AGI, DEX, attack rating, chance to score critical hits, chance to score triple attacks, and critical hit damage. Good for all classes and summoned pets that melee.
Utility Beneficial > Combat Innates
A variety of short-term buffs can be found here. The base duration on some of these buffs are 10 minutes or less. However, extended duration focus can boost these to last much longer.
Night’s Perpetual Terror (lvl 115) – grants a chance to trigger a lifetap proc during melee. Do not neglect a caster asking you for NPT if they choose to melee for these following reasons:
- Casters that melee do high crit damage on the proc (with wizards being the highest).
- Hybrid classes are the next ones that do medium crit damage with the proc.
- Pure melee classes do the least amount of crit damage with the proc.
- Pets do NOT do any crit damage on the proc and only deal base proc damage.
Ecliptic Reinforcement (lvl 111) – increases in power based on NoS progression completed. This spell is part of your spell rotations, so it will always be cast and buffed on cooldown.
- Increases damage to all damage spells.
- Has a chance to apply a damage proc and remove 12% hatred (aggro reduction).
- Restores a small amount of mana.
Mana Rebirth (118) – adds damage procs to damage spells. This is a handy little buff worth pre-buffing on casters before triggering a group mission or raid. It doesn’t last long at 4 minutes, but it has 20 procs you can use up. Note that twincast spells will consume two procs.
Auras
Enchanters are one of the few classes that can keep up two Auras simultaneously. The following auras act as beneficial group buffs provided that your group is standing NEAR you.
Main Auras – if you’re the only enchanter in group.
Twincast Aura (lvl 84) – permanent-type, which is obtained from the Seeds of Destruction expansion. Grants an 11% chance (at Rank 3) for all group members to Twincast their spells.
Mana Radix Aura (lvl 120) – expires after a period of time. This is a mana-strike aura that adds the chance for all group members inside to gain additional damage procs to their damage spells. Note that the procs themselves CAN crit, and will be notable higher for WIZ and MAG.
Situational Auras – if there is a second enchanter in group.
Enhancing Aura (lvl 118) – also known as a damage amplification aura which increases the base damage of direct damage spells only by 4%. Takes 30 seconds to kick in upon casting.
Marvel’s Aura (lvl 117) – permanent-type, increases (slightly) mana regen and endurance regen
What About Other Enchanter Auras?
Most auras mentioned here are aDPS auras – they add extra damage to damage spells for you and any casters in group. Unfortunately, all other auras of beneficial or detrimental varieties may not do enough to warrant the damage loss of not using aDPS auras. There can be a few exceptions in the case of solo/molo play, but those depend on your gear and play-style.
Self Survival
Your personal survivability mainly comes from your wide assortment of self-runes and a self spell guard to boot. Runes alone should be maintained on you as much as possible considering you take a heavier beating than other casters when you are crowd-controlling, especially.
Self Spell Guard
Shield of Inevitability (lvl 117) – All INT casters have this 2-in-1 threshold melee and spell guard.
- Absorbs 60% of DD damage that exceeds over a certain threshold, up to a set amount.
- Absorbs 75% of melee damage, exceeding over a certain threshold, up to a set amount.
Self Runes
** Polycascading Rune (lvl 120) – Self rune
- Absorbs all melee or DD damage up to a set total set amount.
- Will PB AE stun mobs up to level 123 around you once it dissipates.
- ** In some places or some raids, the PB AE stun may not be a good idea.
- ** Rune of Tearc (single-target rune) can be an alternative, instead.
Eldritch Rune (activated AA Ability) – Self rune
- Absorbs all melee or DD damage, up to a total set amount.
- This is your strongest self rune at max ranks.
- Should be pre-buffed on you, so it’s up and ready the next time you need to use it.
Veil of Mindshadow (activated AA Ability) – Self melee guard
- Absorbs 60% of melee damage only, up to a total set amount.
- Should be pre-buffed on you, so it’s up and ready the next time you need to use it.
Fade Abilities
Enchanters have two such abilities (self version and a targeted version) that don’t share the same timers. Both are auto-granted AAs that only work on mobs up to 5 levels higher than you. Both abilities mez you in place and apply a mez buff in your buff window that you can quickly click off once you are ready to resume running.
- Self Stasis
- Friendly Stasis
It’s worth noting that although Friendly Stasis may seem enticing to use on another player, you might kill an unsuspecting player with it instead. Both these fade abilities should be reserved for your use only. All other classes have their own forms of fade abilities.
Spell Guards
Heavy AE mechanics have persisted through the years, and spell guards have become an ever increasing group and raid-wide survival tool for enchanters to employ. While most spell damage is generally survivable (or avoidable) in group missions, on raids it becomes a different story.
Group Spell Guards
There are three Group Spell Guards that are generally pre-buffed before engaging an event. On raids, enchanter rotations can additionally be set in place to MGB particular ones mid-combat as needed. Diligently re-apply any spell guards on your groups, too, as needed.
Legion of Liako (lvl 120) – Spell Guard
- Absorbs 20% of DD damage, up to a total set amount.
- Consumes 1 Peridot.
- Note that priests are the only caster class that don’t get Shield of Inevitabilty. They will heavily rely on you to keep this spell guard up in places where heavy DDs are faced.
** Marvel’s Auspice (lvl 117) – Damage Shield Mitigation and Spell Guard
- Decreases damage shield damage taken per hit.
- Absorbs 25% of DoT damage (per tick), up to a total set amount.
- Consumes 2 Peridots.
- ** Preferred spell guard to use with TB/MGB on raids mid-combat for heavy AE DOTs.
- ** Higher damage absorption and total set amount absorption than Legion of Xetheg.
Legion of Xetheg (lvl 117) – Spell Guard
- Absorbs 20% of DoT dmg (per tick), up to a total amount.
- Requires but does NOT consume a Peridot in your inventory.
Glyph Spray (AA Ability)
The holy grail of all spell guards (technically, a spell shield and a spell guard all in one). It is almost always used on raids in anticipation of receiving spell damage that can potentially cripple your raid force. More often than not used for heavy direct damage about to hit.
- AA ability that will instantly AE buff aka “spray” all nearby players around you with it.
- Absorbs 100% DD spell dmg, up to a total amount (Spell Shield).
- Absorbs 25% DoT spell dmg (capped amount – depending on rank, per tick), up to a total amount (Spell Guard).
The large spell shield component is what makes Glyph Spray shine. Enchanters can MGB Marvel’s Auspice for AE DoTs instead, as there is no capped absorption amount per DoT tick. However, if there is not much else going on, it can still be used for AE DoTs in bad situations.
Crowd Control
The most common form of CC is mezzing (aka sleeping or enthralling) a mob. There are also other ways to CC for when a mez may not quite work out which will also be discussed here.
Try to Avoid Mezzes with Blur Components
… if not pulling. The main reason enchanters (especially on raids) get chewed-up on mez breaks is simply because of the memblur component found on various enthrall spells. You’re erasing any aggro that may have already been established by tanks using their aggro abilities.
If you need to blur for any reason, you have auto-granted memblur activated AAs such as Fog of Memories (single-target) and Blanket of Forgetfulness (targeted AE) which cast fairly quick.
Here is a quick list of recommended mez spells with no blur components:
- Chaotic Puzzlement – single-target mez
- Bewildering Wave – targeted AE mez
- Perilous Bewilderment – PB AE mez
Direct Damage > Enthrall (The Twincast Mez)
A single-target mez spell that, once successfully lands, grants you two procs of twincast to use with pure direct damage spells. Another good reason you want to use this type of mez spell is because it’s you’re only single-target mez lacking a memblur component.
Utility Detrimental > Enthrall
Single-Target Mez (listed in red) – All single-target mez spells listed under this section have a memblur component.
Targeted AE Mez (listed in light green) – targeted area effect mez
- Will mez any mobs within a radius of your targeted mob.
- Best used if needing to mez 3 or more adds.
- Great for mezzing clusters of mobs at a distance.
- NOT great for mezzing mobs at your feet, which can result in mezzing yourself, too.
PB AE Mez (listed in blue) – point blank area effect mez
- You don’t need to have anything targeted.
- Typically used to quickly CC multiple mobs surrounding you on all sides up close.
- You won’t accidentally mez yourself.
- Does NOT overwrite single nor targeted AE mez.
- Very short duration, but you can overwrite with targeted mezzes afterwards.
Hard-to-Resist Mez Spells
As you try to level and/or look to acquire Rk. II spells, you may find yourself struggling with mez resists due to not being max level in current content. In some cases, you may be forced to tash first before finally landing a mez, or you can choose to keep up hard-to-resist mez spells.
Such spells all have a 1:30 min refresh/recast time before you can use them again.
- Flash line of mezzes – these are all single-target mezzes
- Glance line of mezzes – these are all targeted ae mezzes
If you are in groups using such spells, it means that you can’t handle many add mobs. This is why they are generally used during the “leveling-phase” of an expansion.
Other Ways to CC
Root – For mez-immune or DoT’ed add mobs that don’t summon.
Single-Stun – For an add mob being continually damaged or DoT’ed.
PB AE Stun – More situational in exp groups than on raids. An April 2021 patch nerfed PB AE stuns to all share the same timer. You’ll end up seeing more action out of this spell on raids where an enchanter stun rotation may be needed to lock down multiple adds in some places.
Charm – More often used in some places by raid enchanters where mobs are immune to mez spells but not charms. It can also be another alternative to CC’ing a DoT’ed mob in exp groups.
Punt AAs – Spells that will push mobs backward in the direction you are facing, blur them, and root them anywhere up to 18 seconds. Enchanters have two punt AAs that are auto-granted.
- Beguiler’s Direct Banishment (AA) – Single-target punt.
- Beguiler’s Banishment (AA) – Front-Conal AE punt, affects up to 8 mobs.
- Both these AAs share the same timer, but have a 6 second re-use time.
- Both these AAs take 1 second to cast.
- Good for mez-immune mobs in sticky situations.
- Hazardous as you can potentially aggro even more mobs if you punt into nearby mobs.
Debuffs
The first rule of enchanter club is to TASH!
Edict of Tashan (lvl 117) – Known as just “tash.” Magic-Resist debuff, and also adds a flat damage increase to chromatic-based spells that land on the mob.
Slowing Helix (AA) – will cast the highest rank of slow you know. Even if you don’t have max ranks of this AA purchased, it makes sense to just use it anyway to free up a spell slot. The 70% slow percentage is the same across the last several-expansion slow spells.
Mental Contortion – an activated AA ability. At max AA ranks, it does the following:
- Reduces base melee damage, reduces hit accuracy, deals a weak DoT
- Should be reserved for named or boss mobs, as it has a 9 min reuse.
Eradicate Magic – an activated AA that strips up to 4 beneficial buffs off a mob. If a mob has a strong damage shield that can annihilate melee DPS, that is definitely one scenario to use this ability. This ability also eliminates the need (most of the time) to keep up a dispel magic spell.
Spell Rotations
Your sustained aDPS (and personal DPS) primarily comes from using a spell rotation. The more damage spells you cast, the more aDPS you give your group. Spells are being cast in a particular order and which refresh in the same order. They accomplish the following:
- Priority given to Ecliptic Reinforcement (combate innate spell) to keep on cooldown.
- Next priority is to proc Beguiler’s Synergy for the group via Mindreap spell on cooldown.
- All damage spells will periodically proc Gift of Hazy Thoughts AA and Gift of Mana AA.
Double-Grip Spell Rotation
Preferred for single-target sustained aDPS, or mobs that die fast.
- Ecliptic Reinforcement
- Mindreap
- Throttling Grip
- Throttling Grip
DoT Spell Rotation
Generally, useful for cycling through add mobs that don’t die fast on raids. Just be careful not to overwrite any of your own Mind Vortex DoTs that may be twincasted on the same mob.
- Ecliptic Reinforcement
- Mindreap
- Mind Vortex
- Throttling Grip
Help! My-Mana-Sucks Spell Rotation
If you’re really struggling on mana, this is an alternate spell rotation that still provides the same exact aDPS output. However, it’s not great for personal DPS. Please do NOT use the Appropriation-line of nukes! Such nukes will throw off your rotation and minimize aDPS.
- Ecliptic Reinforcement
- Mindreap
- Polyluminous Assault
- Throttling Grip -or- Chromashear
Multibind Keys
A good way to sustain spell rotations without skipping a beat is through multibind keys (aka “mash keys”). They work better than using social keys which tend to skip over spells.
1. Dedicate a Hot bar for multibinding and place spell gems on it.

- In the above example, I chose Hot Bar 10.
- Hot Buttons 2 through 5 have spell gems mapped out for the Double-Grip rotation.
- Hot Buttons 8 through 11 have spell gems mapped out for the Double-DoT rotation.
2. Open your Options window via ALT + O
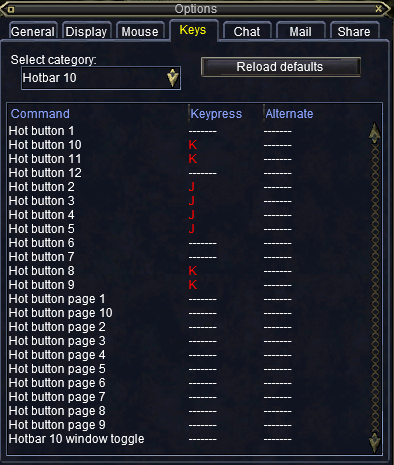
- Select the Hot Bar category (again, in my previous example I am using Hot Bar 10)
- Assign a key for Hot Buttons 2 through 5 (I used my “J” key) for the first rotation
- Assign a key for Hot Buttons 8 through 11 (I used my “K” key) for the second rotation
- Done! Test your new multibind keys out on a combat dummy to ensure they work
aDPS and Burns
aDPS stands for assisted damage per second. It is the main benefit you provide to damage casters in your group. aDPS is provided through three main sources:
- Auras – By primarily keeping up Twincast and Mana Radix Auras for your group.
- Sustained aDPS – via a spell rotation (to proc special things for your group).
- aDPS Burn – This is where you activate special AA abilities for a huge aDPS and damage boost. Such abilities will have long refresh timers and need to be used at opportune times (ie: during a raid encounter or killing a named in a group mission).
After you finish debuffing mobs, you are generally going straight into sustaining aDPS until you coordinate on the right mobs or points in time to burn with your group.
Beguiler’s Synergy
This is a passive ability found under your AA Focus tab. It will proc 100% of the time to buff your group with synergy when you land your Mindreap DD nuke – regardless if it is resisted. A bulk of your sustained aDPS will come from this proc alone as it will increase the base damage of one fire, ice or magic spell by 65% for casters in your group. For this reason, it is why spell rotations are setup in a certain order to ensure Mindreap is immediately used off cooldown.
How to Setup Your aDPS Burn
1. It’s advisable to dedicate an entire Hot Bar just for your burn. It will make it easier for you to burn in a precise order. It contains a combination of AA abilities, social keys and spell gems.

2. Next, create a Social Key (shown as Burnzz on the Hot Bar) that will activate Illusions of Grandeur, Improved Twincast, Calculated Insanity and Focus Arcanum all at the same time. This will save you time from individually clicking those abilities.

3. Optionally, you can also create another social key that both activates Chromatic Haze and notifies the group that it is up on them. I find it is good practice to alert the group when it’s on. This way they know when to use their highest damage spells to consume with the CH buff.
aDPS Burn Order
Your burn order (based on the Hot Bar setup along with social keys) will be as follows:
- Forceful Rejuvenation
- Ecliptic Reinforcement (Spell Gem)
- Click Social Key to activate: IoG + ITC + CI + FA
- Mindreap (Spell Gem)
- Click Social Key to activate: Chromatic Haze
- Click Robe
- Throttling Grip (Spell Gem)
- Mind Vortex (Spell Gem)
… and then immediately resume a spell rotation for sustained aDPS.
Spire of Enchantment
As soon as IoG wears off, follow-up with Spire of Enchantment. It will continue providing a small aDPS boost and mana regen for the group. It should subsequently be kept off cooldown each time whenever IoG is not on the group.
When to aDPS Burn
Keep in mind that you are not burning for yourself, but rather for your group to take advantage of your IoG and Chromatic Haze together with their own ITCs. As such, you should typically be burning whenever your casters in group have ITC available. Since ITC is an ability you have, too, this should act as a rough indicator of when their ITCs will be back up. It is common courtesy to ASK your group members in advance if they are ready to burn together with you.
Charms and Stuns
Charming and stunning can go hand-in-hand well, and will be discussed together here.
Differences in Charm Lines
Enchanters get three lines of charm spells. Two charm spells are given in leveling expansions, while the third charm is given in non-leveling expansions. All charm spells have built-in buff components, eliminating the need to buff charmed pets (with the exception of NPT).
Command line of Charm – any charm spells with “command” in their name have at least a 30% chance to stun the mob in place when charm breaks/wears off. This is a better charm to use in exp groups and solo’ing simply because many mobs can be stunned.
Demand line of Charm – any charm spells with “demand” in their name have at least a 30% chance to blur the mob and make it forget you when charm breaks/wears off. It also has a higher resist check than all other charms. This tends to be a better charm to use on raids where many mobs may not be stunnable.
Regular line of Charm – these don’t have “command” nor “demand” in their names, and don’t offer the stun or blur perks of the other charm lines. They are available mid-way leveling into an expansion, so they will be replaced in use no matter what with either Command or Demand as soon as you reach max level.
Single Stun vs PB AE Stun
Stuns lock up a mob from doing anything for several seconds. They are great in general to help mitigate damage on either a player or a charmed mob that is tanking. Both Dizzying Vortex (single-stun) and Color Conflagration (PB AE stun) work on mobs up to level 123.
Targeted Single Stun
- Takes 2.5 seconds to cast and lasts 7.5 seconds on a mob
- Has a 6.5 second recast time
- Has an additional Direct Damage component built in.
- Can be used continuously off refresh.
PB AE Stun
- Takes 2 seconds to cast and lasts 6 seconds on a mob
- Has a 12 second recast time
- Cannot be used continuously due to the long recast time.
- Will stun all mobs within a short radius of you.
Pet GUARD Command
Whenever you charm or re-charm a pet with a spell, it will default to “Follow” you around. You need to always keep a charmed pet away from you and in a stationary position via the Guard command instead. This way, if charm breaks, you have enough time to re-charm it again.
General Charm Play (for Solo/Molo’ing)
1. Scope out a zone and find a suitable spot with plenty of room.
2. Tash your intended charm pet at max-casting range, which should give you sufficient time to follow-up with a charm spell to secure it before it smacks you.
3. Keep your pet on Guard and stay at a safe distance from it.
4. Find a mob, tash-pull, and send your pet in. Make sure to slow the mob as well.
5. Stay at a safe distance, DPS as you normally would, but single-stun periodically.
6. If charm breaks, and you’re at a safe distance, you should be able to re-cast charm and immediately send the pet back on the target. You will need to set Guard on the pet again.
7. If charm breaks, and both mobs are very close, PB AE stun and then immediately recharm. You can also use Beguiler’s Banishment AA to punt both mobs back and root them in place (briefly) until you sort out recharming.
Dealing With Charm Breaks
There are a couple of ways to deal with a charmed pet breaking, in which case you may end up with two mobs charging at you.
Phantasmal Opponent – to keep the loose mob busy
Doppelganger – to also keep the loose mob busy (or if Phantasmal Opponent is down)
Beguiler’s Banishment – if both mobs are on top of you or close to you
PB AE Stun – if both mobs are on top of you or close to you
Dire Charm
An AA ability that operates depending on one of two conditions being met. It has a 30 min reuse timer, and does NOT automatically buff a charmed pet. You will need to buff it, if you choose so.
1. If the mob is level 46 or lower, it will stay permanently charmed while you’re in the zone. This is useless for current-content enchanters since you can just use an animation pet that does more damage instead if you are in zones with such lowbie mobs.
2. If the mob is higher than 46 (you can Dire Charm up to your level with max AA ranks), it will guarantee you a 6 minute-long charm (no early breaks).
Dire charm may be useful for when you want to kill a particular quest or named mob, and need the charm to be guaranteed for the entire 6 min duration. A lot of named mobs summon (once charm breaks), and it may be risky in some areas to rely on spell charms all while both being summoned by a named mob and dealing with recharming a pet at the same time.
How to Ditch a Charmed Pet
Bored of your pet? Need to swap from a spell charm to a Dire charm? Assuming you have the pet on guard and safely at a distance from you, simply invis yourself and use a fade ability – Self Stasis. You can also Gate, of course, if you are done for the day – but don’t do that if you’re with or near a group of players. The mob will end up on top of them.
Pulling
Enchanters are very good pullers in static zone content. Most mobs in the ToL expansion are susceptible to the calm-line of spells. When CC’ing was previously discussed, it was advisable to avoid mezzes with blur components. However, in the case of pulling, they should be used.
Still Mind (lvl 117) – Reduces the aggro radius of a mob for at least 45 seconds, and does NOT require line of sight. This is a main spell to keep up for pulling.
Ward of the Beguiler (lvl 120) – A short-duration self buff that mezzes and mobs below level 123 that hit you, briefly, for 10 seconds. This is a good safety cushion to use with your runes.
Skull of Null (Clicky Annul Magic Item) – This is a half-second cast dispel item. Useful to remove a mez off a mob. https://everquest.allakhazam.com/db/quest.html?quest=9092
No matter how you are pulling, it’s best to always be standing at max casting range.
How to Use Still Mind for Pulling
Still Mind is meant to be used for single-pulling mobs that are spread out. An example is pulling from a room with two mobs – one in each corner. While they are still within aggro radius of each other, if you Still Mind both mobs, you should be able to single-pull one of them with tash to make it come by itself.
How to Use Single Mez for Pulling
If two mobs are standing side by side, Still Mind won’t work. In this case, you can use a single target mez, such as Addle (lvl 116). As soon as you land the mez on one mob, the other mob should aggro and come running to you. By the time you make it to camp, the mezzed mob will most likely be blurred from the mez, and remove itself from your extended target list.
How to Use Targeted AE Mez for Pulling
If you see a cluster of mobs, this will require a targeted AE Mez. You can use Bewildering Wave (lvl 119) which does not have a blur component, or you can use Confounding Glance (lvl 119) which has a memblur component, is hard to resist, but has a 1:30 min recast time.
Once you have the mobs mezzed, you can peel a single one out of the group by dispelling the mez off via Skull of Null (or some dispel item clicky) or a Cancel magic spell.
Uh-Oh! A Bunch of Mobs Are After Me
Maybe you misjudged the distance on mobs when using Still Mind. Maybe your AE mez was resisted by half the mobs in a camp. You can always run away and then hit one of your fade abilities (ie: Self Stasis) after reaching a safe distance. If the mobs have already caught up to you, then immediately use a PB AE Mez, Bewilderment (lvl 118). At this point, you have a split second decision to make if you keep on running, or follow-up using a Target AE Mez (before the PB AE mez wears off within 6 seconds